
This page is a tutorial for configuring monolingual JSON files.
Prerequisites
This tutorial uses JSON configurations with:
-
Make sure to choose “Version 2” in the configuration screen.
-
Choose the monolingual option.

Useful links for understanding JSON paths are:
-
https://support.smartbear.com/alertsite/docs/monitors/api/endpoint/jsonpath.html (An introduction)
-
https://jsonpath.com/ (A tool to try out JSON paths with your documents)
Example 1 - Translate all content
Let’s start with the simple example below. Our objective is to translate all the text content:
{
	"module": {
		"text": "This is an example",
		"title": "A title to translate"
	},
	"options": [ "Delete element", "Add new element" ],
	"welcome": "Welcome to this product"
}
We use the configuration below. The code ..* (two dots and a star) is a JSON path and it will select each and every text in the file.
Explanation: The * means to translate any node, whatever its name and the .. means to look for these nodes in any location (level of depth) in the file.
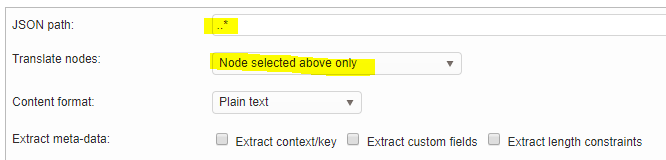
And we can even make it simpler with this configuration. We put * (putting nothing has the same effect) into the path field (which selects nodes at the root level) and then choose to translate all the children of those root nodes.

Example 2 - Translate certain nodes only
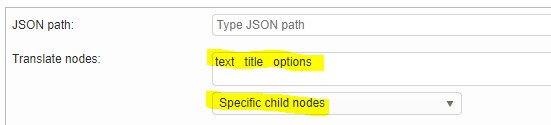
In this example, we want to translate the “text”, “title” and “options” node but not all the other ones such as the “key”.
{
	"module": {
	    "key": "module-228787",
		"text": "This is an example",
		"title": "A title to translate"
	},
	"options": [ "Delete element", "Add new element" ],
	"text": "Welcome to this product",
	"customer": 12121,
	"customer-data": "internal information"
}
Our configuration now explicitly states the node names we want to translate:
Example 3 - Translate nodes in arrays
In this example, we have the translatable nodes in an array below “data”.
{
  "data": [
    {
      "id": 1002,
      "description": "Please review the conditions above.",
      "text": "The conditions need to be accepted."
      "fontSize": "11px",
      "action": "none",
    },
    {
      "id": 1019,
      "description": "Thank you for submitting your request.",
      "text": "Your request is submitted."
      "fontSize": "11px",
      "action": "none",
    }
}
Our configuration requires an array selector:

The [*] means that we want to select every element of the “data” array. Then we specify the nodes in each array object we want to translate.
Example 4 - Arrays and translate all properties
When your JSON is an array of objects, then leaving the JSON path empty will not extract all the properties of all the objects.
Example:
[
    {
        "text": "Hello",
        "description": "Whatever"
    },
    {
        "text": "Good morning",
        "description": "Whatever again"
    }
]
To extract all the properties and texts, use this JSON path:
$[*]
To extract just the “text” property, use:
$[*].text
Example 5 - Extract meta-information with texts
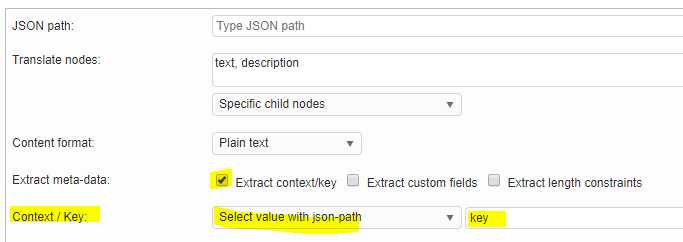
Let’s look at a JSON file that contains product descriptions. With each product there is a title, a description, an identifier and some more meta-information.
Our objective is to extract texts + meta information. This can then be made visible to the translation team.
[
	{ "key": "product-1000", "title": "Washing machine", "description": "A great machine", "internal-info": "Seems to be our best seller!" }
	{ "key": "product-1092", "title": "Coffee machine", "description": "Also a great machine", "internal-info": "Make sure to translate properly" }
]
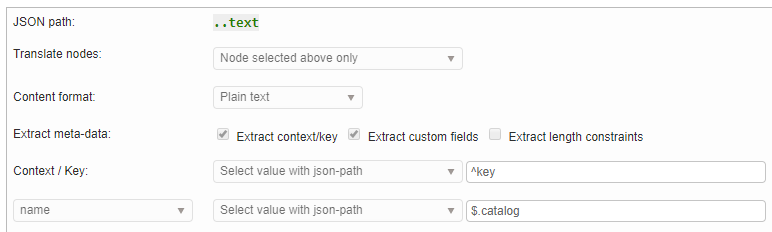
In our configuration we ticked the “Extract context/key” option and put another JSON path to select the “key” node. It will be extracted to the segment’s key/context field.
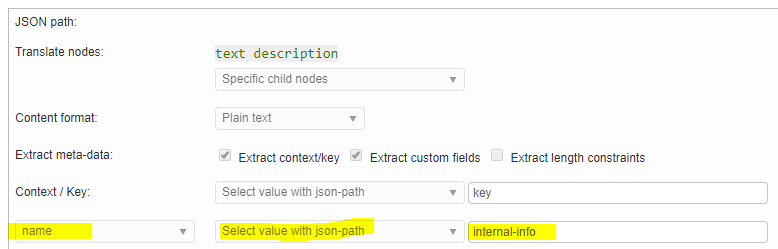
You can also pull data and save to each segment’s custom fields like this:
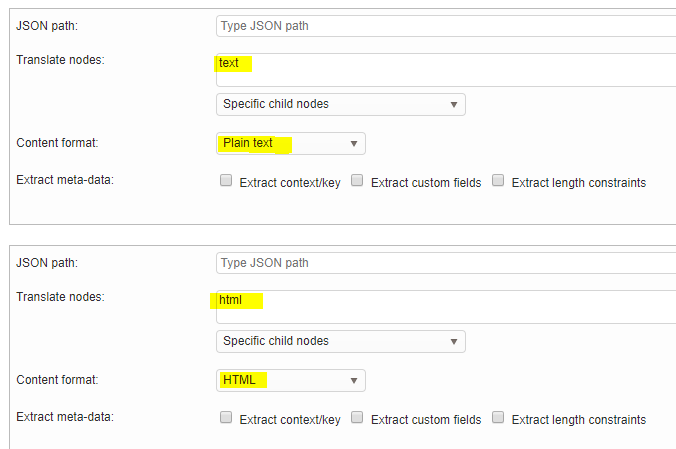
Example 6 - Handling plain text and HTML content
JSON files may contain HTML formatted content. Our file contains “text” nodes that are not html and “html” nodes that are, well, HTML.
It is important to tell the filter if there is HTML because it will protect markup in the translation editor.
{
	"html": "<p>Hello <strong>world</strong></p>",
	"text": [ "Simple text", "Another simple text" ],
	"section": { "html": "<div>Some more formatted text</div>"  }
}
We achieve this by simply defining two JSON paths. One for our plain text nodes and one for our HTML formatted nodes:
Example 7 - Using advanced node selectors
Check out the file below. Each product has “status” field. We only want to translate if its value is “yes”!
[
	{ "title": "Washing machine", "description": "A great machine", "translate": "yes" }
	{ "title": "Coffee machine", "description": "Also a great machine", "translate": "no" }
]
The JSON path now includes a condition on the parent’s object { … } : [?( … condition …)]
It checks that the product object has a “translate” property with value “yes”: @.translate == 'yes' . The @ character represents the object in the array we look at.

Example 8 - Extract meta-data from any location in the file
We already discussed an example earlier on how to extract meta-information. These examples were simple in that the meta-information was on the same object level as the actual text to translate.
In the JSON below we want to translate the “text” properties and attach to it the meta-information “key” and “catalog”. The “key” is one object level above “text” and the “catalog” is at the root. How do we select those fields?
{
	"products": [

		{
			"key": "1000",
			"product": { "text": "This is a product" }
		},
		{
			"key": "1000",
			"product": { "text": "This is a product" }
		}
	],


	"catalog": "Summer products"
}
The configuration is:
-
We use the
^character to tell the system that the property namedkeyis one level further up in the hierarchy relative to the translatable text. -
We use the
$to start searching forcatalogfrom the root of the document. Hence,$.catalogfinds this property in the root.
To move two levels up in the hierarchy we would have typed ^^key.To simply find the first catalog property in the document whatever its level, we would have written $..catalog (two dots).
The ^ character is not part of the JSON-path standard but is a feature we added for the JSON filters.
Final word
We only touched on some of the possibilities of the JSON filter. For more advanced files check out the JSON path links printed in the top.
With the advent of CHAT GPT and other LLMs, constructing JSON paths is made a bit easier. See the the following question and result:
Given the JSON below: What is the JSON path to extract the "text" properties?

[
    {
        "text": "Hello",
        "description": "Whatever"
    },
    {
        "text": "Good morning",
        "description": "Whatever again"
    }
]
Answer from GTP 4o:
The JSON path to extract all the "text" properties from the given JSON array is:

$[*].text

Here’s a breakdown of the JSON path:
$ refers to the root element of the JSON document.
[*] refers to all elements in the array at the root level.
.text refers to the "text" property of each element in the array.