
Wordbee Translator supports a wide range of formats for uploading documents. For the full list, see Supported Document Formats. Once a project has been created, you can upload documents for each target language and any reference materials, and prepare them for translation in a single flow.
This article covers:
-
Uploading files: how to add documents to the project's Documents tab.
-
Preparing files for translation: how to configure target languages, text extraction rules, and workflow either directly from the upload popup or later from the right-click menu.
Upload documents
Go to the Documents tab of the project. On the left, you can see folders created automatically for the source and target language(s) selected at project creation, along with a folder for reference material.
To upload, select the appropriate language folder in the folder view, then click Upload files or use Drag & Drop. If you click Upload files, click Add to select one or more files (or zip archives), then click Upload to start the upload. Click Clear list at any time to empty the upload list and start over without closing the popup.
Wordbee Translator automatically recognizes and corrects common filename issues, such as invalid character encodings. If a file cannot be processed, the upload fails and an error message is displayed: rename the file and try again.

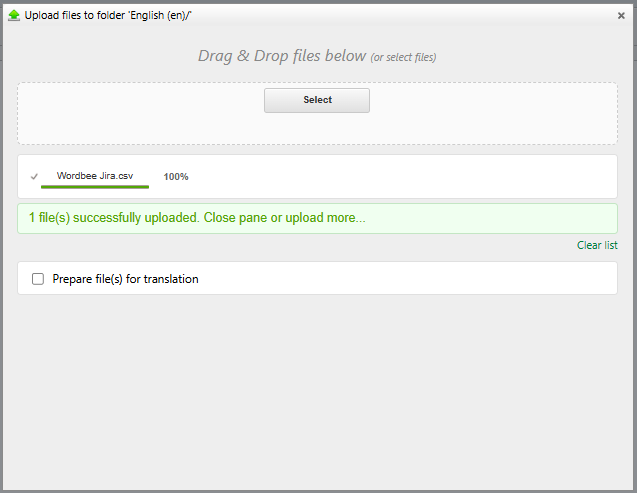
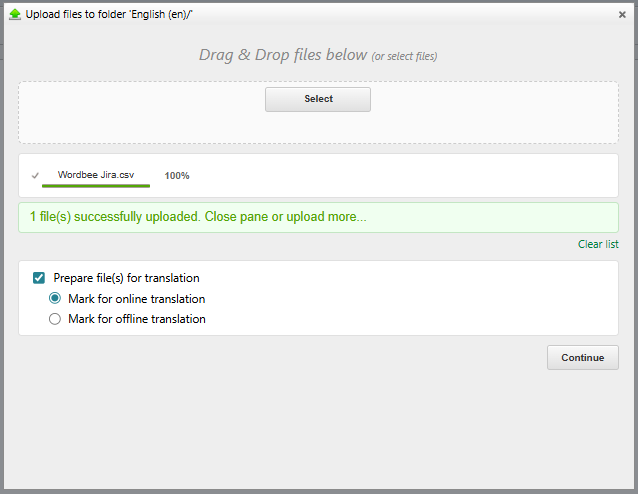
After at least one file has uploaded successfully, the Prepare file(s) for translation checkbox appears below the file list. The checkbox is unticked by default: you can ignore it and close the popup if you want to upload the files now and prepare them later.
To prepare the files in the same flow, tick the checkbox. The Mark for online translation / Mark for offline translation radio buttons appear, with Mark for online translation preselected:
-
Mark for online translation: The files will be translated in Wordbee Translator's web interface.
-
Mark for offline translation: The files will be downloaded by the supplier and translated in a separate tool. This option is available only for Standard projects.
Click Continue to open the Prepare file(s) for translation popup with the option you selected already applied.
Mark documents for translation
The Prepare file(s) for translation popup opens in one of two ways:
-
From the upload popup (recommended): tick Prepare file(s) for translation after the upload completes and click Continue, as described above.
-
From the right-click menu: in the Documents tab, right-click one or more files and choose Translate Yes/No, then one of:
-
Mark for online translation: opens the preparation popup in online mode.
-
Mark for offline translation (Standard projects only): opens the preparation popup in offline mode.
-
Mark for no translation: sets the file as reference material. The preparation popup does not open.
-

In the popup, configure how the file(s) will be processed:
-
Languages and workflow: The available languages are those defined in the project. You can select a predefined workflow; if none is selected, Wordbee Translator applies the project's default.
-
Text extraction rules: Specify how text is extracted from each file. Each file format has a default profile, which you can override from the dropdown. To create or customize profiles, see Document Formats.
-
Pre-translate from earlier document version: Tick this option and select a previous version of the file to reuse its translations automatically. Only new or modified segments are left empty for the linguist to translate.
-
Customize segmentation rules: Tick this option to adjust how paragraphs are split into segments. Both language-independent and language-specific rules can be configured here.

Click Confirm to validate your choices. A green mark and a star are then shown next to each file in the Documents tab, indicating the file is ready to be translated online (or offline, if selected).

If you close the upload popup after ticking the checkbox but before confirming the preparation, the uploaded files remain in the library with status "Not for translation". A confirmation dialog reminds you that the preparation step has not been completed and that you can prepare the files later from the right-click menu.
Learn more
-
Supported Document Formats: The full list of file formats accepted for upload.
-
Document Formats: How to create or customize text extraction profiles for each file type.
-
Customize Text Segmentation: How segmentation rules split source text into translatable segments.
-
Versioning of documents: How to reuse existing translations when a source file is updated.