
Here we describe the initial setup and configuration for your CMS integrations.
Project Setup
We advise setting up a project for each Content Management System (CMS) you wish to integrate. However, if your specific scenario warrants it, linking multiple systems to a single project is also feasible.
Key project configurations include:
-
The API supports both Standard and Codyt projects.
-
Initialize your workflow on the "Workflow & Suppliers" page.
-
Enable the option "Automatically create and save translated file upon workflow completion" to ensure that deliverables are immediately available for download upon completion.
-
-
Setup webhooks for real-time notifications upon the completion of a workflow and the availability of the file for download.
-
Activate the "Trigger webhook upon workflow completion" setting.
-
Define the webhook endpoint and parameters, see: Use Workflow Webhooks
-
Note: In scenarios where webhooks are not feasible, periodically check for completed workflows at regular intervals, such as hourly, by accessing projects/{pid}/workflows/list/completed
-
-
Configure document formats, also known as file filters, as outlined in the following section.
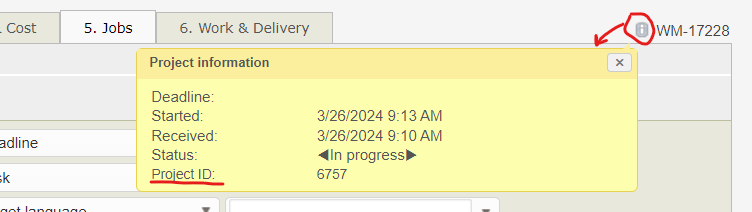
Get the project ID:
-
The numeric project ID is required with the API. Either call an API (projects/list ) to find your project by reference or locate the ID online in the project page:
Document Formats
Specify the format of the data transferred from your CMS to the project. Is the data formatted as JSON, XML, STRINGS, or another supported format? We suggest the following approach:
-
Create filters for the content files. This is done in the “Settings” area of Wordbee Translator. Experiment with your test files in this environment until you are certain of their effectiveness.
-
Create a “Document Format Profile”, that consolidates all the filters employed for integrating with the CMS.
-
Go to the project settings and assign the document format profile.
-
This step ensures that your content is always processed appropriately when pushed into the project.
-
API Key
To authenticate with the API, you need a user and its API key:
-
Create a dedicated “API” user. We strongly recommend against using your own administrator or personal Wordbee Translator account. The user must be internal and should be assigned a Project Manager profile. See Creating API Keys
-
Enable API 2 access for that user: Login as Admin, go to “Settings” then “API 2” and add user to the list.
-
Find the user’s API key: Login as the user, click “My Account” then “API”. The API key is displayed.