
A pricelist may be created and/or assigned to the new client by hovering your mouse over My company in the toolbar and then clicking on Prices. Here you can create as many pricelists as you want and decide to make them available to certain clients.
By doing so, you will only see the pricelists which apply when selecting one during the creation of a project and selecting a client. The system will only show the pricelist(s) you have specifically assigned to the client (or all clients).
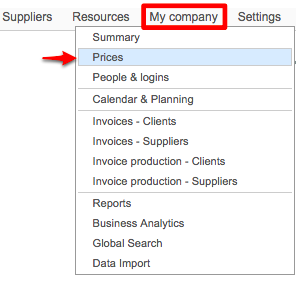
This will open up the pricing information for your company and you will be able to create new pricelists, make changes, or assign a pricelist to specific clients.

The following sections have been provided to help you create a pricelist, add prices, and assign a pricelist to a specific client:
Creating a Pricelist
To create a new pricelist, click on Add new pricelist or Create a copy at the top of the screen. If you create a copy, then the details of the currently selected one will be automatically populated into the new one.

When you add a pricelist for a client, this process involves entering the languages, services, and pricing information that has, in most cases, been pre-negotiated with them. By entering the pricing information, you will know the precise cost for the client.
This includes entering discounts for fuzzy matches, currency information, minimum charges and prices. For each type of service, you must enter the languages and word pricing to ensure proper calculation in the system for quotes, costing, and additional calculations. To configure a new pricelist, perform the following steps:
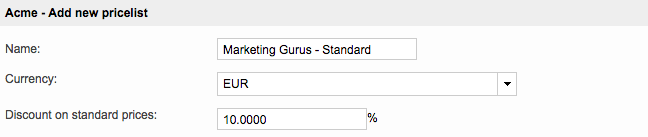
Step 1: Enter a name for the pricelist.
The name should be something to help identifying it, but also the provider and services. If it applies for a specific client, then their name should be included for easy identification in the system.

Step 2: Select a currency and enter discounts.
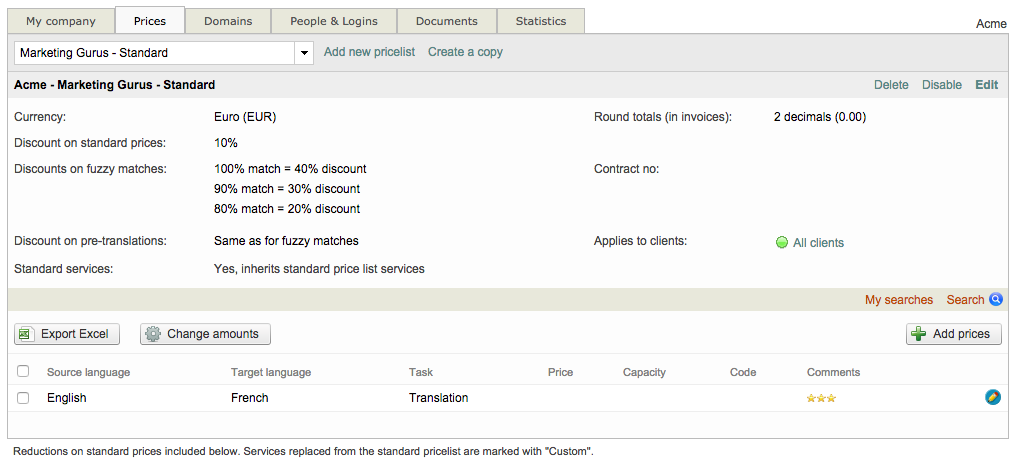
Click on the Currency drop-down menu to select the currency for pricing and then type in a Discount value for standard prices (if required). In the example below, the currency is EUR and a 10% standard discount will be automatically applied.
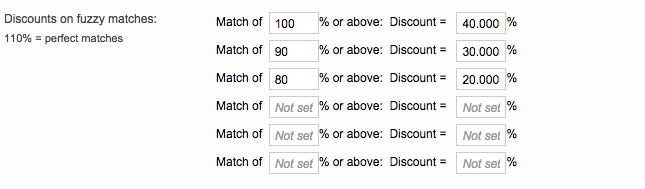
The Discounts for fuzzy matches option may be used to enter the discount percentage for each fuzzy match percentage in the system. Click on the field next to Match of to enter the fuzzy match percentage and then click on the field next to Discount = to enter the discount percentage.
The discount will appear for a range between what has been entered and the next level. For example, in the image below the following discounts will be applied by the system:
-
40% for a 100% match or above.
-
30% for fuzzy matches ranging between 90 and 99%.
-
20% for fuzzy matches ranging from 80 to 89%.
Step 3: Configure additional options.
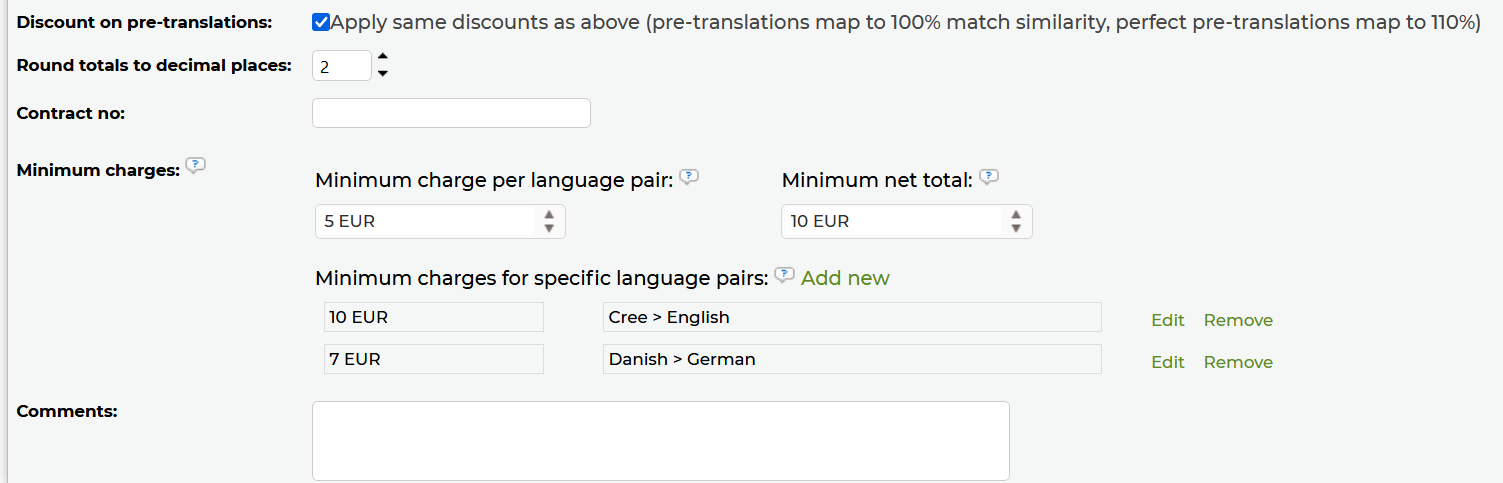
By default, the same discounts as entered above will be applied to pre-translations. If you do not want this to occur, uncheck the checkbox for the Apply same discounts as above option.
You may also change the number of decimal places in rounded totals, enter a contract number, and select or enter minimum charges to be applied on quotations and invoices.
The minimum charges that can apply on each quote or invoice have three types:
Minimum net total
If the net total of all costs on a quotation or invoice is below this value, that net total is increased to this value. Minimum charges for language pairs (the following two settings) are applied before this minimum net total is applied.
Minimum charges for specific language pairs
If the total of all costs associated with a language pair on a quotation or invoice is below the indicated value, that total is increased to this value.
Also, if a minimum charge is not set for the language pair English > French (France), for example, the system reuses the minimum charge that is set for the language pair English > French.
Minimum charge per language pair
This setting applies to other language pairs that are not specified in the setting Minimum charges for specific language pairs. If the total of all costs associated with a language pair on a quotation or invoice is below this value, that total is increased to this value.
An additional field is provided for entering comments regarding the pricelist.
Click on Save in the upper right corner of the screen after finishing the above entries and configuration changes. The new pricelist will appear as shown below:
After a pricelist has been created, you will be able to configure pricing for language pair tasks and assign it to certain clients. Additionally, the following can be performed on the Prices Tab once the pricelist exists in the system.
-
Delete - Remove the currently selected pricelist from the system. Be certain to click OK on the confirmation message to finish.
-
Disable/Enable - Disable or enable a pricelist in the system. A disabled pricelist will not appear within the system as a pricing/costing option.
-
Edit - Make changes to the currently selected pricelist. Be certain to click Save when finished.

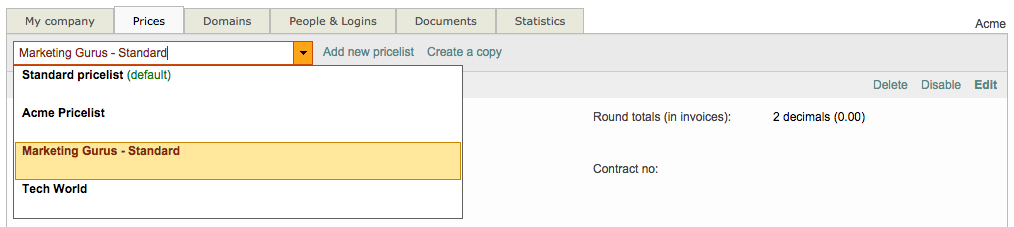
A drop-down menu resides at the top left next to the Add new pricelist option. This drop-down menu may be used to select different pricelists for your company.
Adding Language Pair Task Prices
A language pair task defines the pricing per word, document, page, etc. for a specific source language, target language, and task (translation, revision, etc.). For clients, these are the tasks that you will be performing for them and the prices you charge. After a pricelist has been defined, a default pair is pulled from the standard one; however, you may modify this pair as well as add additional language pair tasks for the client.
You can enter prices for the client's language pair tasks. For example, if French to English translations are part of the services, then this should be entered here along with the price for that task.
To enter pricing information for a language pair task, click on Add Prices. You can enter pricing for one language pair task at a time or multiple tasks. Both are described below.

Method 1: One Target Language
For one target language, simply select the source and target languages from the provided drop-down menus. Then select the task (translation, revision, proofreading, etc.) to be performed for those languages. In the example below, English to French translations will be performed for the client.
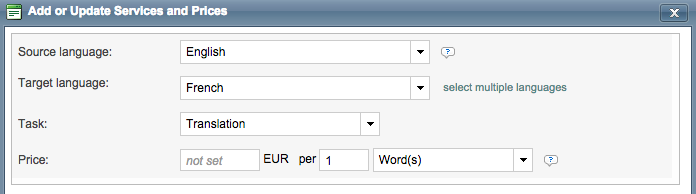
Next, you will need to enter the price for the task. First enter the actual cost and then choose how it applies (i.e. per word(s), per document, etc.) for the language pair task. This could be .5 EUR per 1 word or 2 Eur per 1 page and so on...
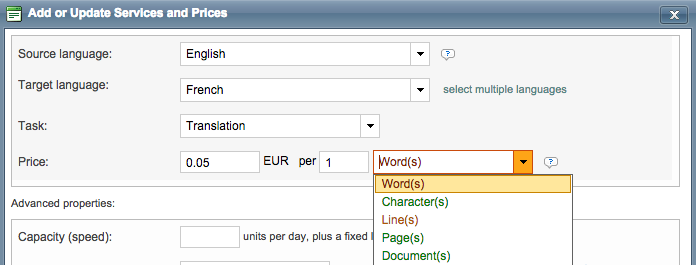
Advanced properties include entering the capacity(speed) for the task, a product code and comments. Once finished, click on Add New.

The pricing for language pair tasks will appear as shown below. If the you will be translating, revising, etc for more than one language pair, then each language pair must be entered here in order to appear in the selection list for client jobs.
In this example, two translation language pairs have been entered with pricing as well as a revision pair. Now the client will appear in the selection list for both translation and revision jobs.
You will see the word Custom to the right of each pairs price information. An initial pair is pulled from the standard pricelist. Once this information is modified or pricing information for a new pair is added, it is considered to be customized by the system.

Method 2: Multiple Target Languages
After clicking on Add Prices, you will see an option for selecting multiple target languages. Click on this option to expand the Target Language Section into a list of languages with checkboxes.

Now you can place a checkmark next to each target language that will be needed for the chosen task (i.e. translation, revision, proofreading, etc.).
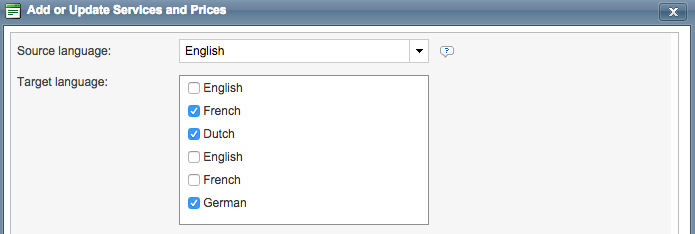
Each pair will be added on a separate line in this section at the entered price per word, page, etc. For this example, three target languages were selected (German, French, and Dutch) and three language pair tasks have been added for English translations.

After at least one price has been added, you will be able to perform a few additional actions. Click on the Trash Can Icon to remove a price or the Pencil Icon to make changes.

Additionally, you can use the checkboxes to the left of each price to make multiple selections and either Export Excel the information to Excel or Change Amounts for more than one price at a time.
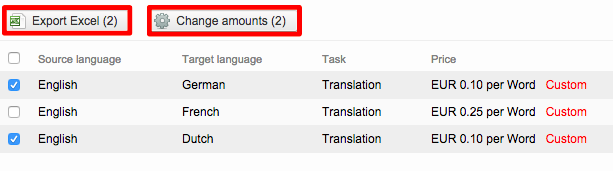
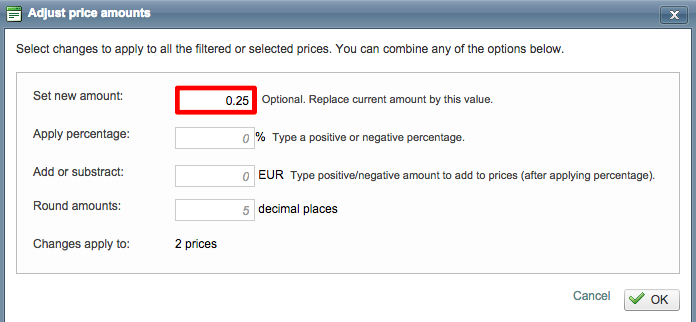
Prices may be changed in 3 specific ways when using the Change Amounts option:
-
Entering a new price - Simply type in the new price and then click on OK.
-
Applying a negative or positive percentage - A negative percentage will decrease the current amount and a positive percentage will increase the price based on the entred percentage value.
-
Adding or subtracting a defined amount - Much like percentages, you can enter a positive or negative currency amount and that value will either be added to or subtracted from the current price for each selected language pair task.
You may also configure the decimal points for rounded amounts. This is helpful when using a percentage because the decimal places might be inaccurate. In the example below, the price for the selected language pair tasks will be changed to 0.25 EUR.
Assigning Pricelists to Clients
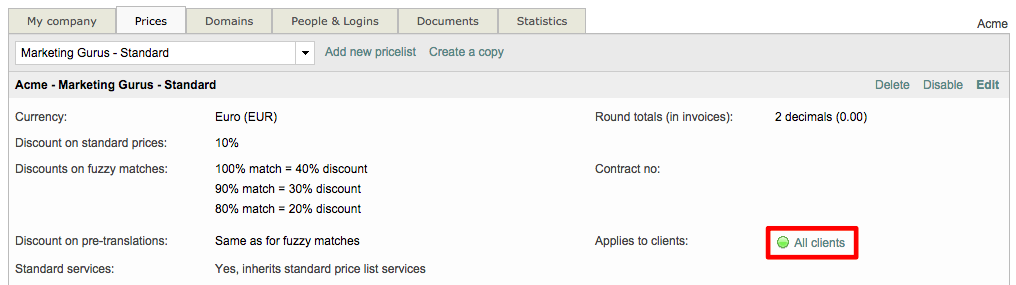
After the pricelist and pricing has been configured, you can assign it to a client. By default, it is available to all clients in the system. To change this, click on All Clients to the right of Applies to clients.
Then click on the Add Clients Tab in the pop-up window and use the Add option to select clients for the pricelist. Once finished, click on Close Window.
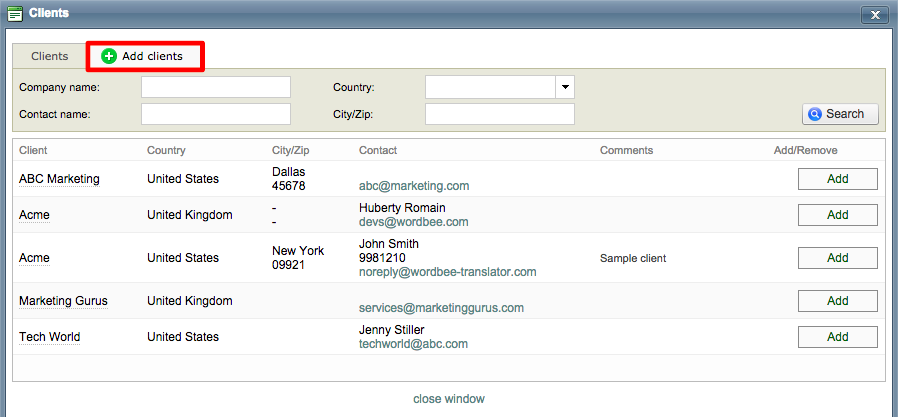
Currently added clients will have a Remove option, which can be used to remove them as an available client for the pricelist.
A search option is provided for finding a specific client in the system. Enter the company name, contact name, etc. and then click on Search to locate the client and add them to the pricelist.
The number of clients available for the pricelist will be displayed after at least one client has been added:

When a pricelist is available for all clients then it will be a selection option for every client in the system in the Project Settings. The Project Settings Tab appears when you edit an existing project and during project creation.
In the example below, the project is for Tech World; however, other pricelists for specific clients are selection items. This creates a margin for error and it is easier to make them available only to the appropriate clients. 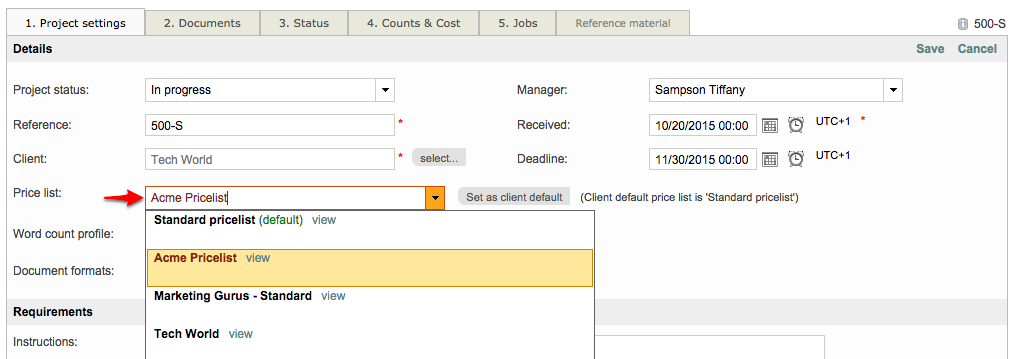
When you specifically add one or more clients, the pricelist will only be seen by those clients. In the example below, only the standard pricelist and the one specifically defined for Marketing Gurus appears as selection choices.
