
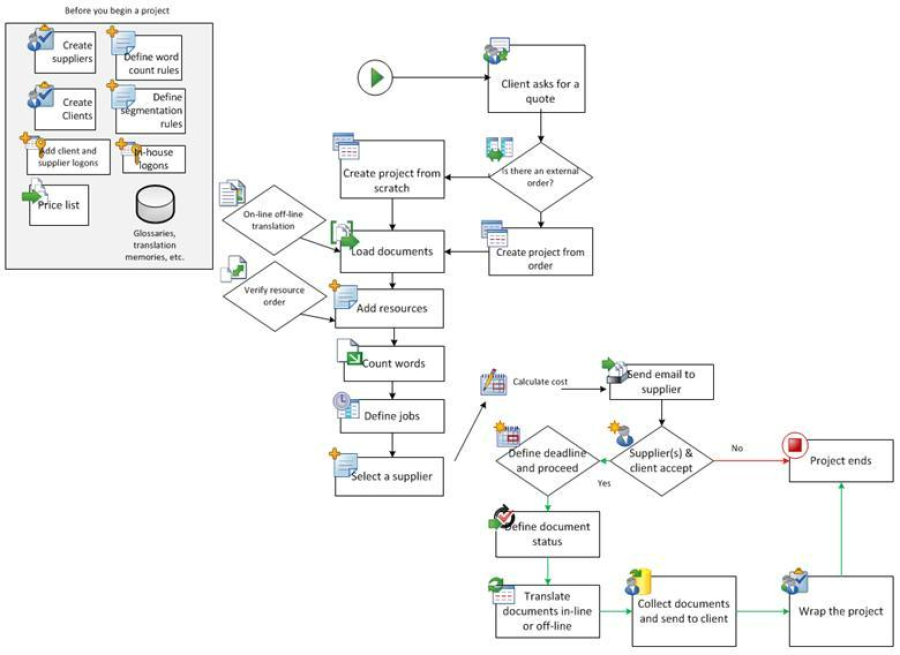
The following steps should be performed for standard projects:
Introduction
When a client requests a service such a translation, the project manager has to define and create a project, send a quote with a price proposition, and finally assign and perform the translations and deliver the project.
As you can see from the image below, a standard project involves six general steps:
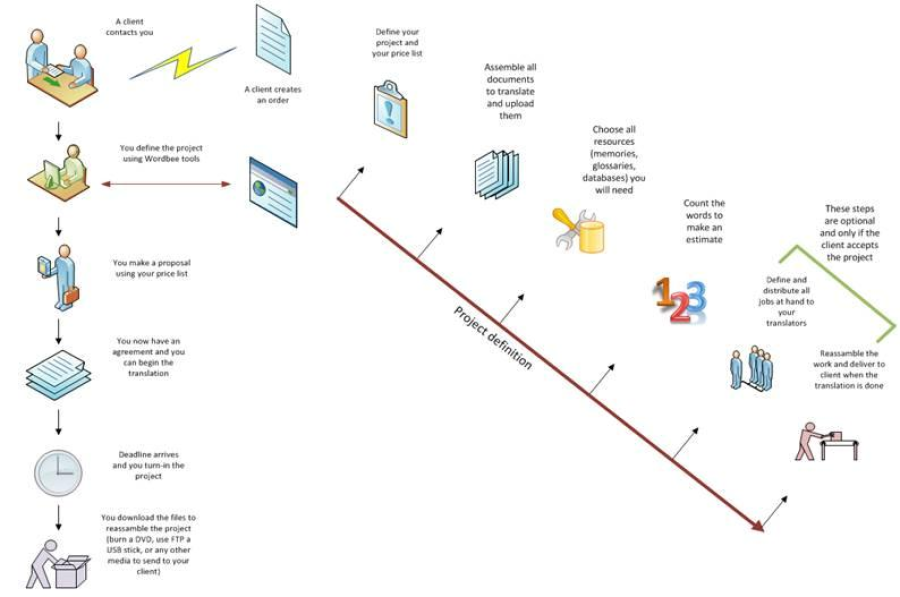
-
Define the project details. Note that they can be predefined if there is an internal or external order in progress.
-
Compile and upload all the documents that are part of the project. This can also be skipped if the client has submitted an internal or external order.
-
Choose project resources that will help with the translation.
-
Distribute the tasks (called jobs).
-
Reassemble the project pieces when the translation is done: download all the documents to your computer and send the final product to your client.
-
Start creating your project:
Use the following image as a guide when you create a project:
In this section, you can find:
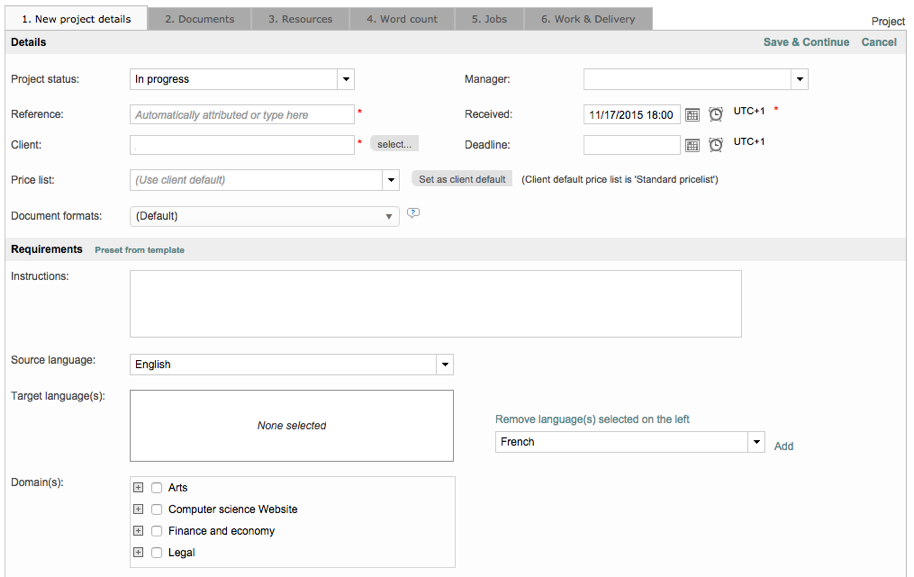
1. Defining Project Details
Once you have met all of the requirements (see: Project requirements ) you are ready to begin defining your project.
To define a new project, follow these steps:
-
In your Wordbee's workspace, click on or point to the Projects' down arrow on the menu bar. A popup list appears.
-
Select New Standard project from the list. The New project details page opens.
Note : You can also create a project by clicking on New project on the Quick links panel of the Home page or on New project located on the upper right part of the Projects page near the search icon.
-
Fill-in the details. This is always the first step. The other tabs are not available until you finish filling in this first page.
-
Click on Save & Continue.
Remarks about the fields of the Project details page:
-
Project status: When you first create a project, it is always set to In progress. However, you can choose another status from the dropdown list by clicking on the arrow.
-
Reference: If you do not fill-in this field, Wordbee Translator generates a reference that automatically contains the year and a sequential number. It is important to have a consistent numbering system since this number is used later on to name the Project memory (see: Project memories)
-
Client: Click on Select to choose. If you are your own client, choose the name of your company.
-
Price list: The price list will be used by Wordbee Translator to estimate the cost to translate the documents of the project and create the proposal that will be presented to your client. If you have several price lists, click on the arrow and select the one you require. To create and/or modify a price list (see: Prices).
-
Manager: Your name will appear automatically. Select another by clicking on the arrow. Note that the name of the user who is logged in is automatically entered in this field; however you can always select another manager (see: In-house logins).
-
Received: Project's date of reception. Click on the calendar icon to select the date and on the clock to select the time.
-
Deadline: Project's date of delivery.
-
Requirements: Click on Preset from templates to select a project template among those registered (see: Project templates).
-
Instructions: This field is used to transmit instructions to your clients or to the suppliers (translators), and they can be typed in any language you want. They can be seen by all your suppliers and anyone able to log on to your system.
-
Source language and Target language(s): To select a language, click on the field and type the first letters of the language; the word will be completed automatically.
-
Domain(s): field(s) of expertise according to which the documents will be classified (ex. data-processing, health, finances, and so on).
-
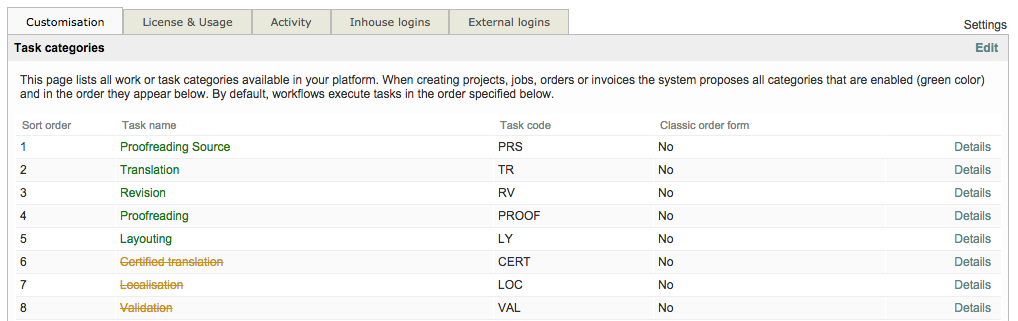
Tasks: Jobs to be done within the framework of the project (translating, revising, etc.) (see: Creating jobs).
Note:
If you are logged in as the administrator, you can customize the list of tasks that appear on the page in Settings - Translation settings - Task Categories.
-
Internal comments: The field is only visible to the people involved in the project
-
Labels: To understand why you might use this feature (see:What is a label?). Once you have defined the project details, you are ready to proceed to the next.
Step: Uploading project documents.
2. Uploading Project Documents
To upload the documents that need to be translated/revised/proofread, follow these steps:
-
Complete all the preceding steps required to create a new project. This tab is disabled until you create the project details (see: Defining project details).
-
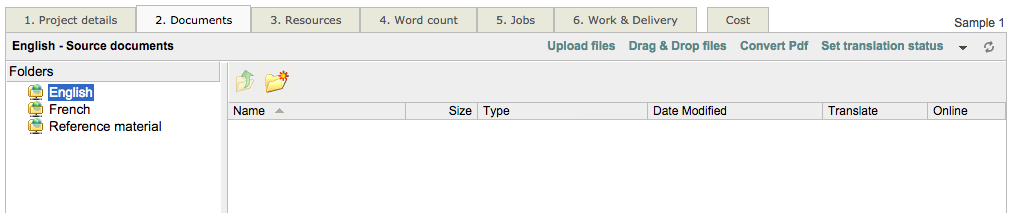
Click on the Documents Tab.
Note:
You can see that some folders have been automatically created depending on the source and target languages defined during the previous step.
-
Click on Upload files. The document formats supported by Wordbee are the following:

-
Follow the on-screen instructions to upload all your documents to the source folders one by one or in ZIP file form.
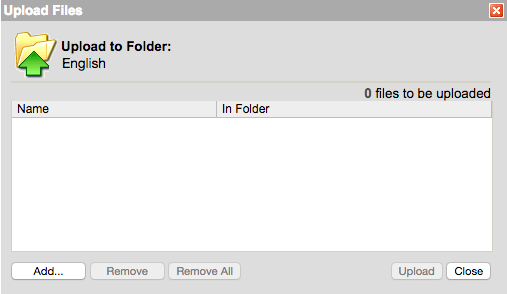
Note: If you upload a ZIP file, you must right click on the resulting file and use the Extract here option.
-
Click on Set translation status or right click on the chosen document and click on Translate yes/no.
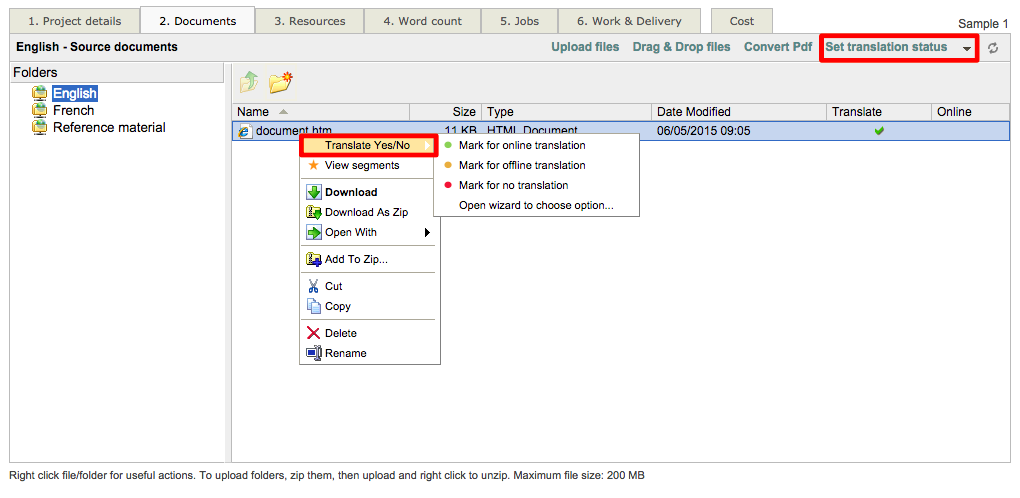
There are three options available:
-
Mark for online translation: The document will be translated by using Wordbee Translator interface.
-
Mark for offline translation: The document will be downloaded by the supplier and translated with another tool (i.e. not using Wordbee Translator online interface).
-
Mark for no translation: The document will only be used as a reference by the supplier.
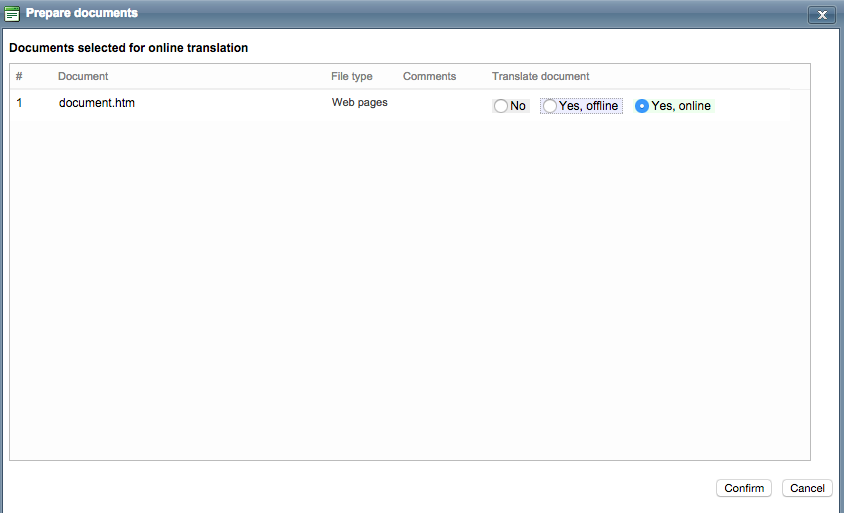
After having selected Mark for online translation, this window opens:
-
Click on Confirm to validate your choice.
-
You reach this page:

-
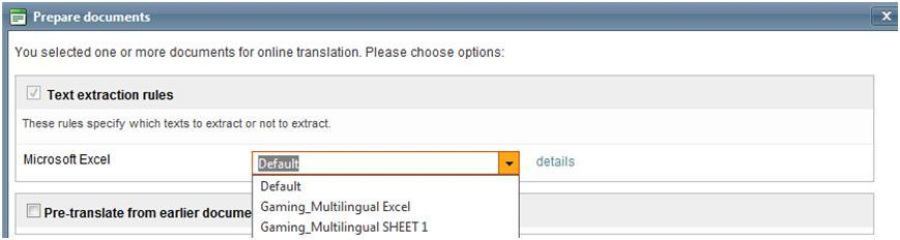
You choose which text extraction rules you want to use.
-
You can pre-translate the document if you already translated the same document previously or a similar document. To do so, tick the Pre-translate from earlier document version checkbox:
Wordbee pre-translates all the sentences that have been translated in the previous version. The new or modified segments are left empty. It is a highly reliable functionality.

-
If you have selected this functionality, here is what you will see in your translation interface:
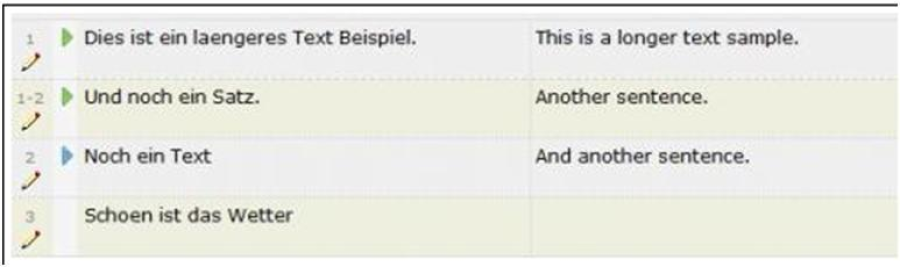
-
The first three segments have been pre-translated: the green arrow means that the previous sentence and the following one are identical in both texts and therefore, the context is the same. The blue arrow means that the sentence has been pre-translated but that the sentence before or the sentence after has changed (either modification of a sentence or new segment)
Note: You can use this function for any type of document, including multilingual ones (see Multilingual Excel files).
-
Customize the segmentation rules (how you want to split the paragraphs into sentences) by ticking the Customize segmentation rules checkbox:

-
Click on Confirm when you have finished preparing the document.
-
The green mark and the star confirm that your document is ready to be translated online:

If you right-click on the uploaded document, you have a menu available that allows you to set the following options:
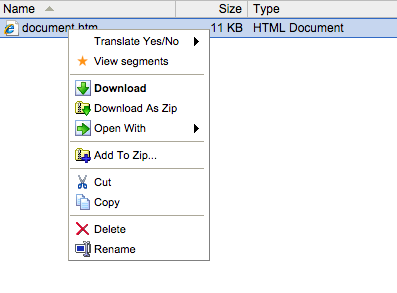
|
|
|
|
|---|---|---|
|
|
Translate Yes/No |
Mark the document for online, offline, or no translation. Open the wizard to select an option (opens the Select Translation Status page on which you can select the documents status). |
|
|
View Segments |
Open the Wordbee Translator interface in a new browser window to display the document's segments. |
|
|
Download |
Download the document to your hard disk. |
|
|
Download As Zip |
Download the document to your hard disk as a Zip File. |
|
|
Open With |
Select the application to open the document. |
|
|
Add To Zip... |
Add this document to a ZIP file |
|
|
Delete |
Remove the document.
|
2.1 Drag and Drop Files
Instead of using the Upload files long procedure (previous topic), you can also use another alternative, much simpler: the Drag and drop files.
How to use it?
-
When you are on the Upload documents tab, you can see the link on the page:

-
Click on it to open a new window in which you can drag your files from your PC/ MAC:
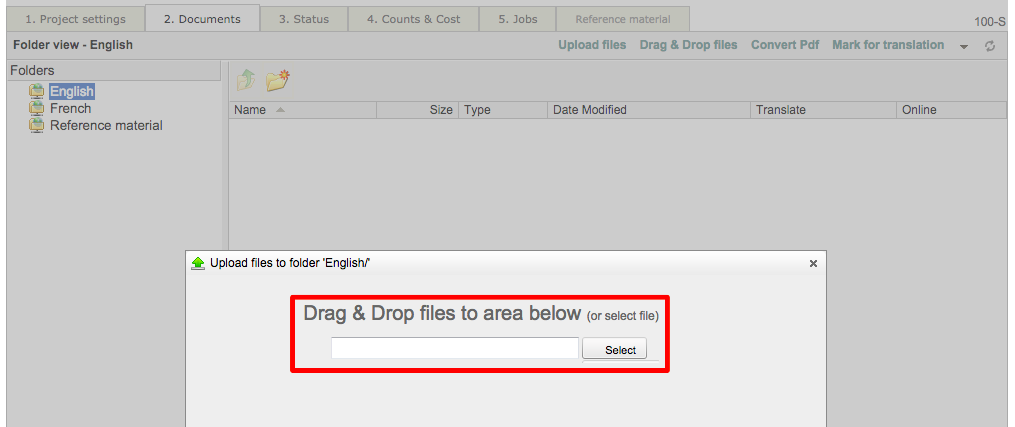
Note: The Select button also allows you to upload multiple files, something the classic Upload files does not allow. You cannot yet upload complete folders. However, you can zip the folder you want to upload and drop the zip archive in the window above.
2.2 Translate PDFs with Wordbee
This option may not be available for your subscription. Please contact our sales team at sales@Wordbee.com.
Step 1:
-
You have uploaded a PDF file.

-
After having selected this PDF file, click on Convert PDF:

Step 2:
-
You will see this window in which you have to confirm your wish to convert the PDF file:
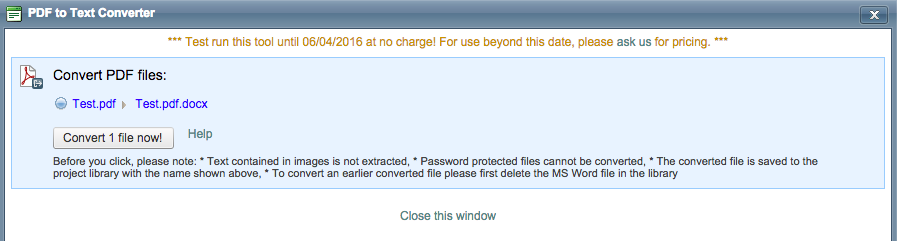
-
Click on Convert 1 file now! and close the window. In the Upload documents tab, you will see that Wordbee has converted the PDF file into a Microsoft Word one:

2.3 Translate XML files with HTML Code
Let's say your XML document contains a <block>node with encoded Html that you want to translate with Wordbee.
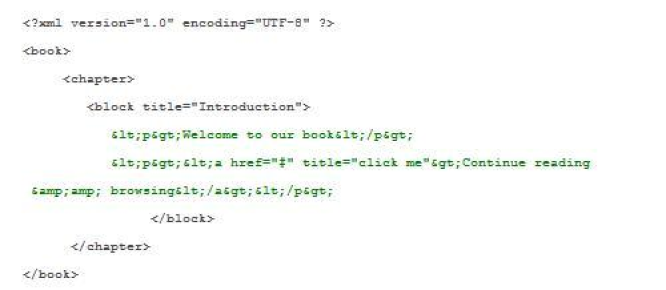
It is possible! You just have to configure Wordbee in order to tell which content needs to be translated:
-
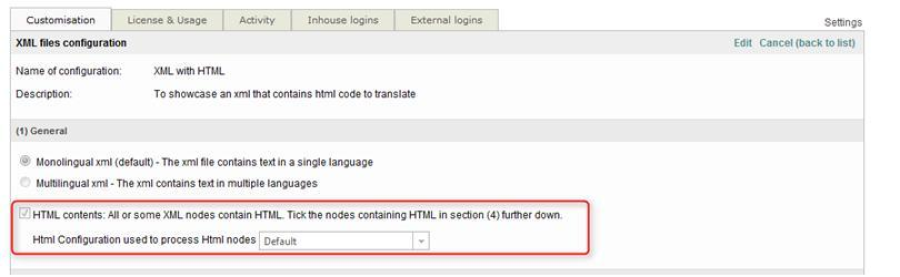
Go to Settings and click on XML files (Translation settings - Document formats). Click on Add new to reach this page:
-
Tick the HTML contents option and you can also choose a configuration for the extraction of html text (leave the default one if it is a standard html).
-
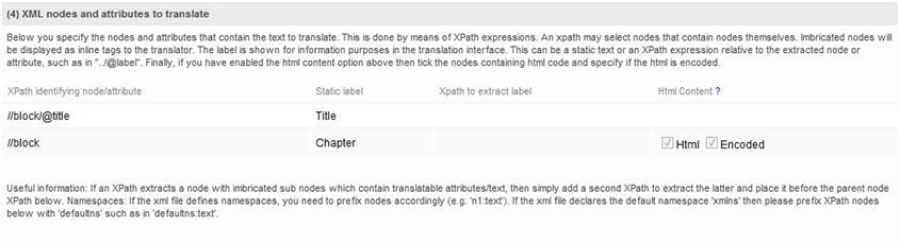
Now scroll down in this page to specify the translatable xml nodes:
-
The rules are so-called XPath expressions :
-
//block tells the system that all <block> nodes need to be translated. Since the contents ishtml, the corresponding option has been ticked on the right.
-
//block/@title will extract the block entitled <block title="xyz"> for translation. This one is just plain text. Important: Attribute rules like this should be put before the rule for extracting the node contents
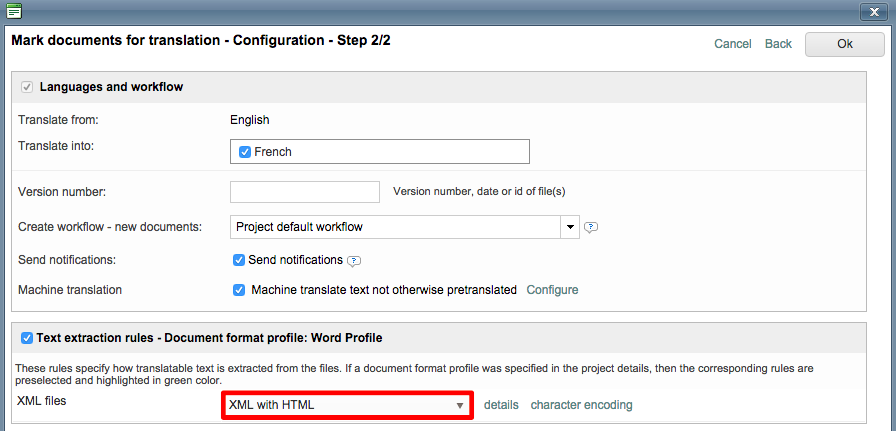
Note: Don't forget to use the right extraction rule when you upload your XML document:
2.4 Multilingual Excel Files
In Wordbee, you can upload multilingual Excel files to translate (multiple columns). First of all, you need to go to Settings - Translation settings - Document formats to configure the settings of the Excel document you want to upload if it has not been done yet.
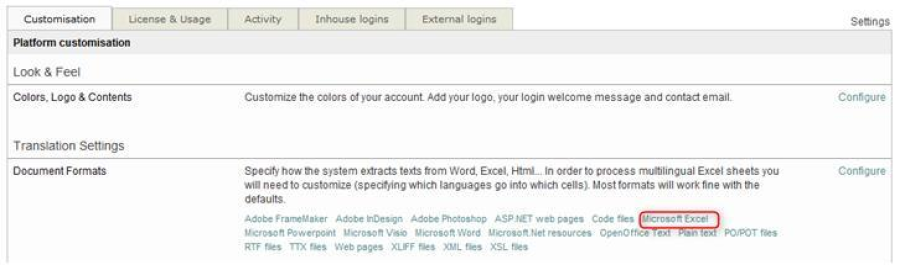
You reach this page and you click on Add new if the format has not been created yet.
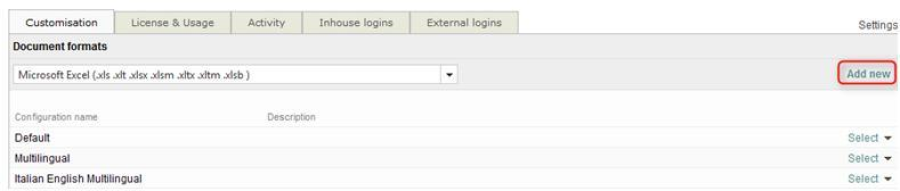
-
Choose Multilingual and then, define which is to be fine in the different columns. For example, English in column A, French in column B, Comments (if there are some) in column C and D, etc. You can add as many columns and languages as you want (see screenshot below).
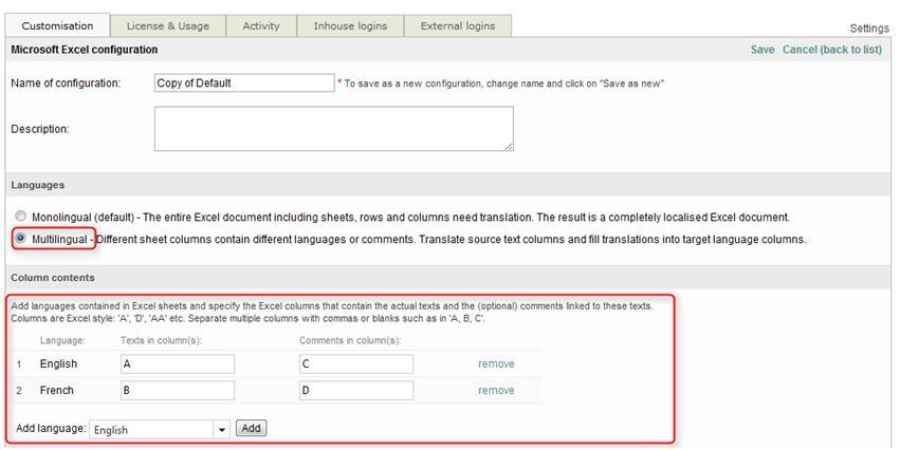
Save your new template and you can now create your project and download your Excel document. Just don't forget to choose the right template in the Text extraction rules section:
To see how to upload a document, go to Uploading project documents.
3. Defining Resources
In this stage, you select which linguistic resources are assigned to the project. First, you should understand how these linguistic resources are created and maintained (see: Linguistic resources).
These resources are translation memories, glossaries, terminology databases and any bilingual or multilingual documents which have been translated in the past and can be re-used as linguistic resources.
To add linguistic resources to a new project, follow these steps:
-
Complete all preceding steps required to create a new project (see:Standard projects).
-
Click on the Resources within the Project Settings Tab.
-
Reuse enabled: This feature (top right of the screenshot below) allows you to enable or disable the reuse of the project memory automatically created for each Project. Indeed, Project memories can be used as Translation memories in other projects to help you pre-translate words, segments, etc. If you click on "disable reuse", the project memory becomes "invisible" and it won't be possible to use it in another project. To see how to set "reuse enabled" or "disable reuse" by default, see: Reuse and consolidation of Memories.
-
Copy contents to master memory: Click on this feature to store the current project memory in a "master" translation memory containing several translation memories that you may have created for a client for example. This feature is customizable, see Consolidation of Project Memories to Master.
-
Click on Add to select the resources you need for your project.
-
A new window with all the available resources opens; here you can select the ones that will be used in the project. Wordbee Translator prioritizes the resources in relation with the target and source language, the client, the rating, and the chosen domain(s).
-
Tick the checkbox of the resource(s) you want to add to the project.
-
Click on Add, Add and close or on Close window when you have made your selection.
-
You can click on the arrows in Sort/Remove

to modify their order. Remember that the order is important because Wordbee will use the first linguistic resource of the list to do the matching process when you begin your translation.
-
To see the details of the resource you have chosen (Name, Type, domains, Languages…), click on Contents.
It opens a new window with four different tabs:
Resource details:
On this page, you have several options:
-
If you click on Delete, you have the possibility of deleting permanently the Resource.
-
If you click on History, it will show you all the History of the data you imported.
-
You can import translation memories (from a TMX, CSV, Excel, Open office or Align Assist file) by clicking on Import and by following the instructions.
-
You can export segments (TMX or CSV) by clicking on Export and following the instructions.
Resource usage:
This page shows the clients using this memory in their projects. You can see the usage in the last month, in the past 2 months, etc.

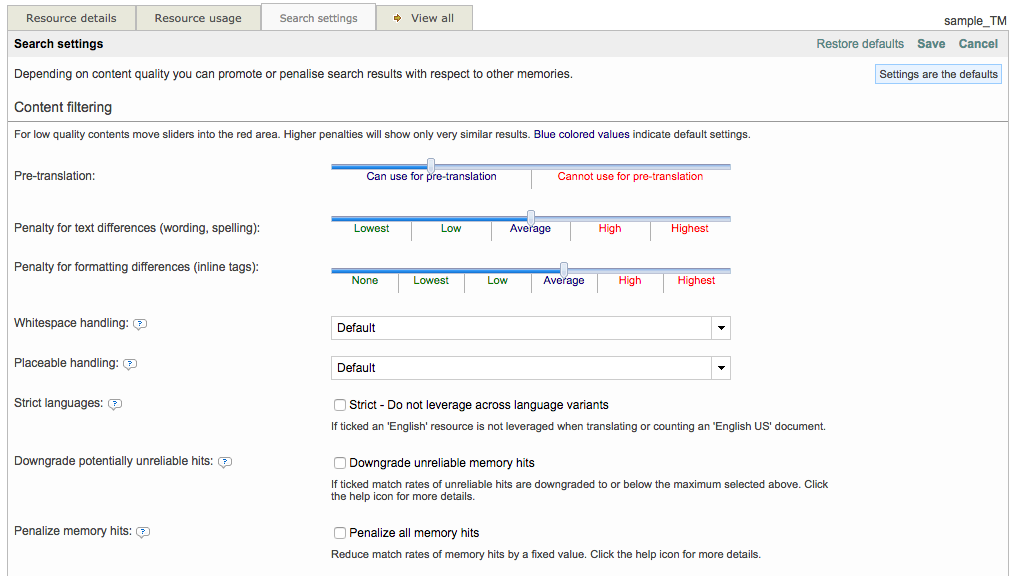
Search settings:
Because the settings are set by defaults, if you really want to change them, you need to:
-
Click on Manage default settings, it will bring you to the Translation memory setting page (see: Settings).
-
Then, click on Edit at the upper right. You are now able to move the sliders from Lowest to Highest.
View all:
By clicking on this tab, you will reach the list of all the resources available (Translation memories, Project memories, Terminology)
For more details, see: Linguistic resources.
You can now proceed to the following step: Counting words.
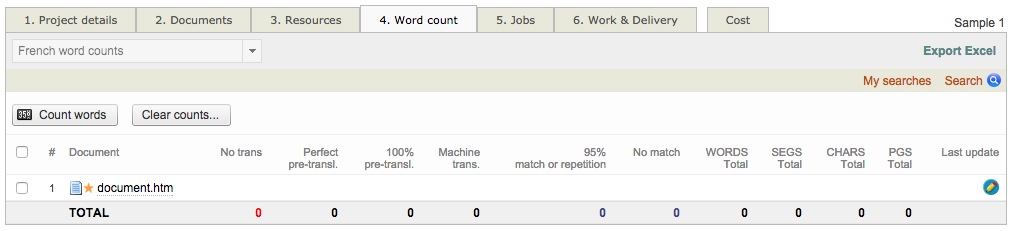
4. Counting Words
In Word count, Wordbee Translator establishes a word count and a pre-translation for all the documents that are part of the project.
To do a word count, follow these steps:
-
Complete all preceding steps required to create a new project (see: Standard project).
-
Click on the Word count tab.
Note: Under the Project details tab, there is a field in which you can choose the word count you want to make if you have selected more than one target language for the project.
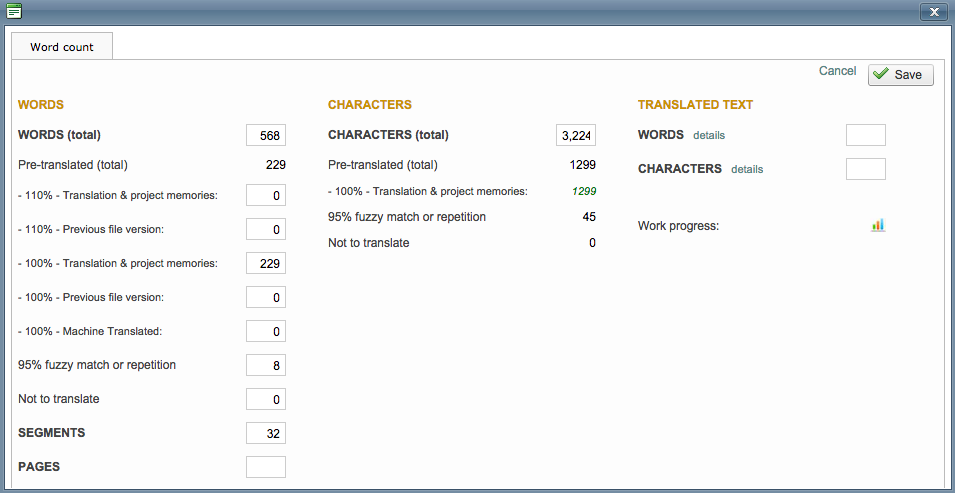
-
Click on Count Words.
-
On the opened page, you configure how words have to be counted and statistics displayed:

-
Select the project you wish to configure by clicking on the Word count profile's dropdown menu.
In this case, it will be this project. All parameters previously established in the Settings during your company's initial set-up are displayed here. If you want to change them, click on view details and select the project for which you want to change the settings by clicking on Select.
-
Customize columns: this option allows you to define precise repetition intervals in the document.
Note: The chosen intervals should be the same ones as the ones in the price list you are using for the project.
-
Set all other parameters as needed. There is a tooltip describing them on the screen.
-
Click on OK.
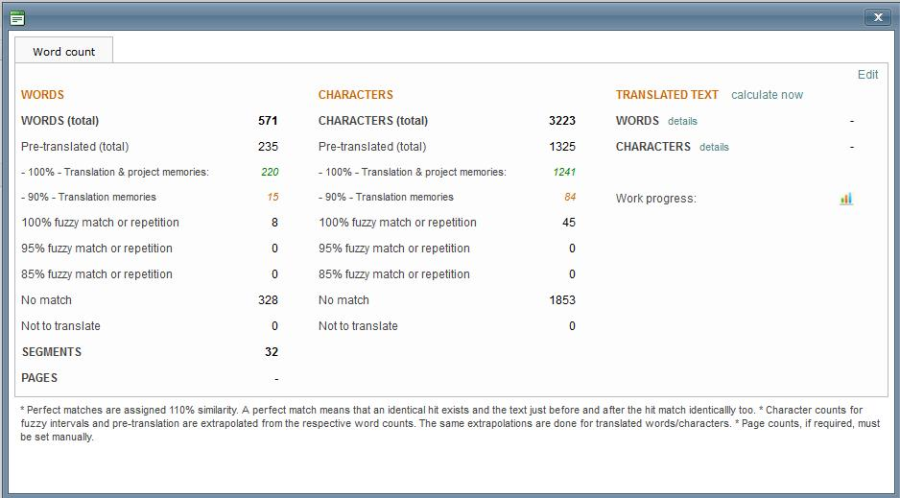
You will see that all have been calculated automatically: the number of Untranslatable words, the Total of words, the total of segments (parts to translate), the total of characters...:

What is the difference between the columns entitled Perfect Pre-translation and the one entitled 100% pre-translation?
It is simple: Perfect pre-translation refers to in-context matches. An in-context match is a segment, which exactly matches a segment already stored in the translation memory, including the context (its preceding and following segment); whereas 100% pre-translation refers to 100% matches, which are segments that perfectly matches segments from the memory regardless of the context.


You can proceed with Creating jobs.
5. Creating Jobs
In this stage, you define all the works that need to be done within the project (translations, proofreading, layout, etc.).
In this section, you will find:
-
Creating jobs
Note: You cannot allocate a job if the client has not approved the project.
To create a new job, follow these steps:
-
Define the project by following the steps stated in Standard projects.
-
Click on the Jobs tab.
-
Click on New Job.

-
You reach the Create a new job(s) page:
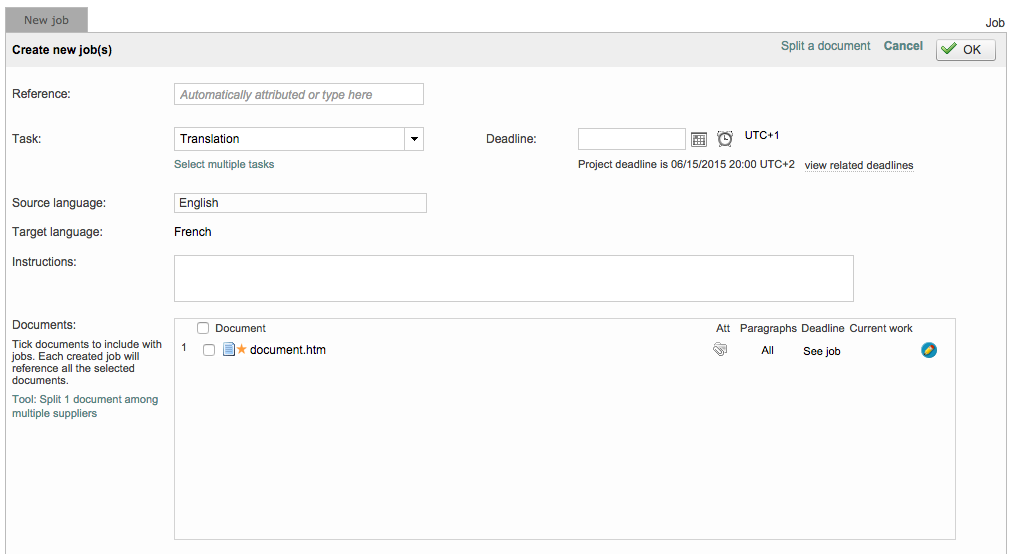
-
Define the Deadline.
-
Choose a Task from the list
-
Type in any instructions for the translator(s)/ reviser(s), etc and some internal comments if needed (these are not visible to the translator(s)).

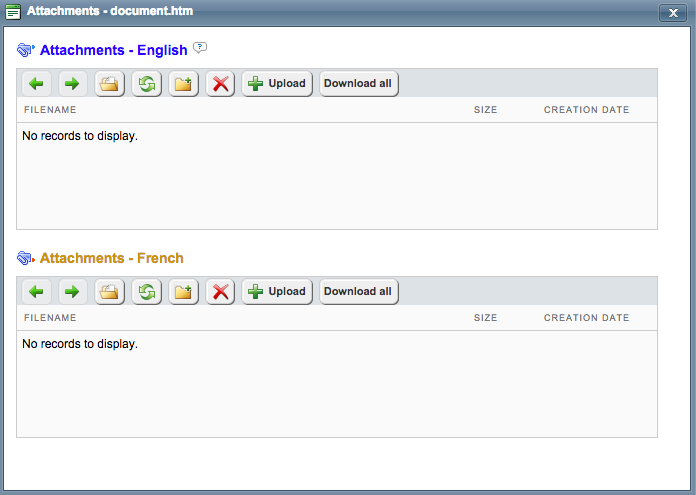
Note: The attachment icon enables to attach some files to the document: it can be screenshots, instructions, reference material or whatever that might be needed. This icon may be used by the project manager, the supplier or simply serve to store documents that are needed by an entire team working on the same project (eg: intermediary or final deliverables...).
By clicking on this icon, it opens a popup window as follow:
Upper part: For source material
Bottom part: For suppliers: a translator can store deliverable documents, a reviser, a revised document.
It is a great place to store different versions of a translated document. All the documents are accessible to all the people involved in the project.
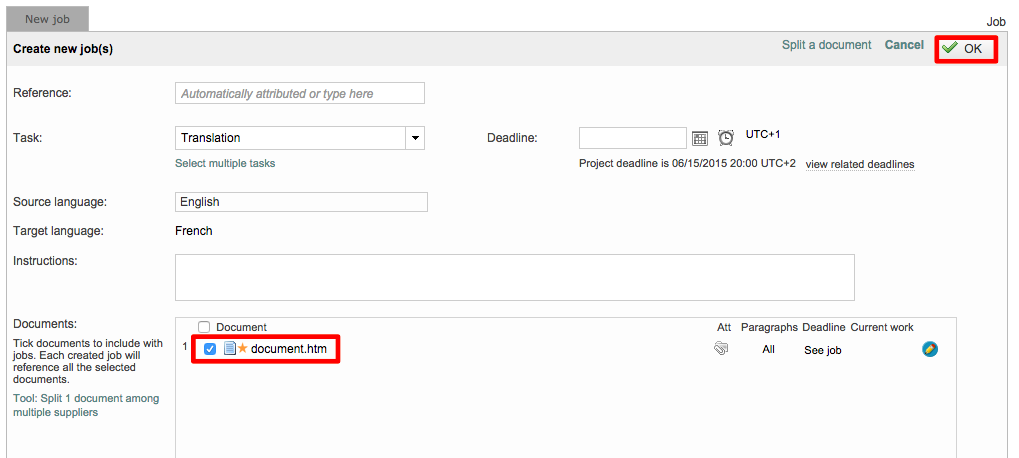
Scenario 1: The project includes one document and you want only one supplier to translate it:
-
Select the document by ticking the corresponding checkbox and click on OK at the top right of the page.
-
Select the supplier by clicking on

:

-
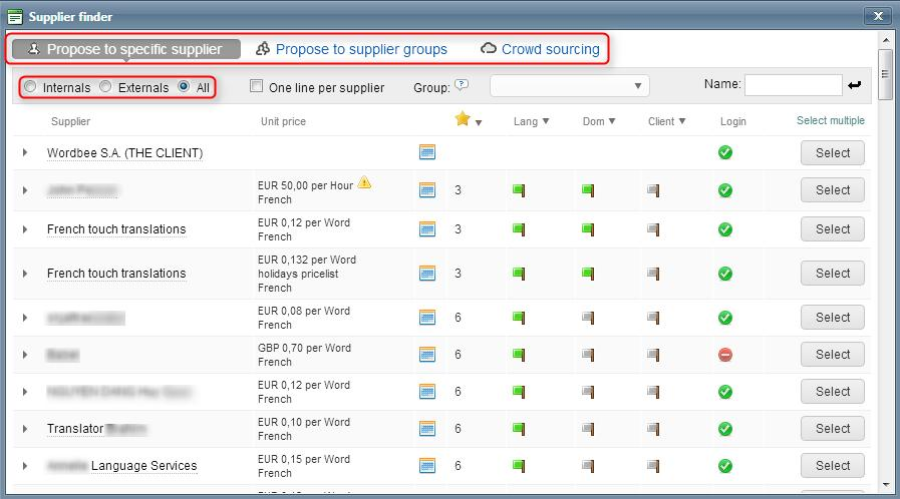
The Supplier Finder opens. Here you can assign jobs to suppliers.
-
Propose to a specific supplier tab: assign the job to one supplier. If this one declines the proposal, you will have to send it to another supplier.


-
Propose to supplier groups: assign the job to a group of suppliers. the first supplier accepting the proposal gets the job. Thus, the other suppliers of the group cannot accept the job anymore. This is called job opening.
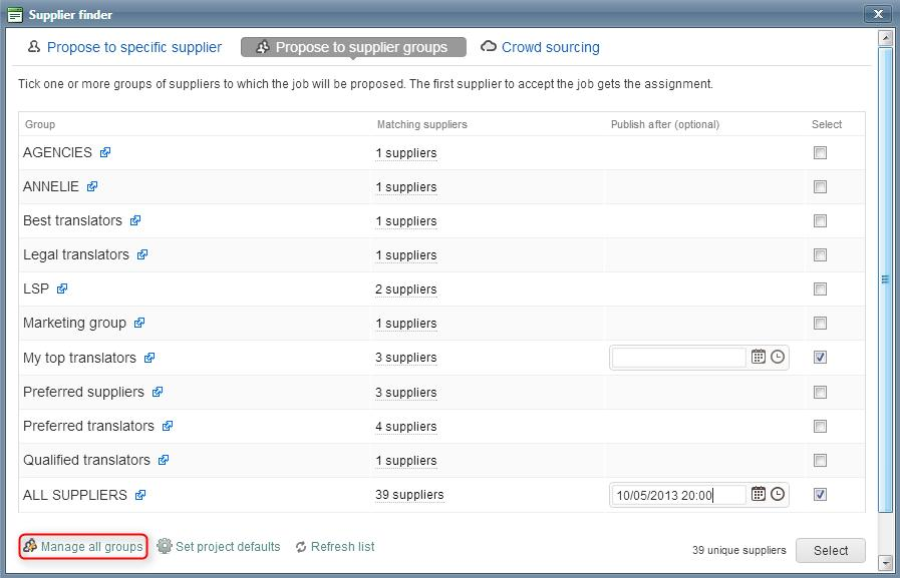
In the list, you tick the groups you want to assign the job to. You can send the proposal to a group (My top translators in the screenshot above) and if nobody accepts the job before 8:00 PM the system will send the proposal to another group (All suppliers in the screen shot above).
-
: Check suppliers registered in the group.
-

: Add, remove suppliers to a group. Get information about a supplier.
-
Crowdsourcing: Works the same as supplier groups but several suppliers can work together on the same document.
-

: Filter suppliers by internal workers, external ones or all the suppliers.
Note: Group sourcing allows you to create your own groups based on your own trusted translators, deliver a high-quality translation faster and reach ultimate flexibility. Groups can be created by domain, language, affinity..., several translators can work on the same document in real-time and they do not need a block of time to work on your documents, they can do what fits into their schedule.
-
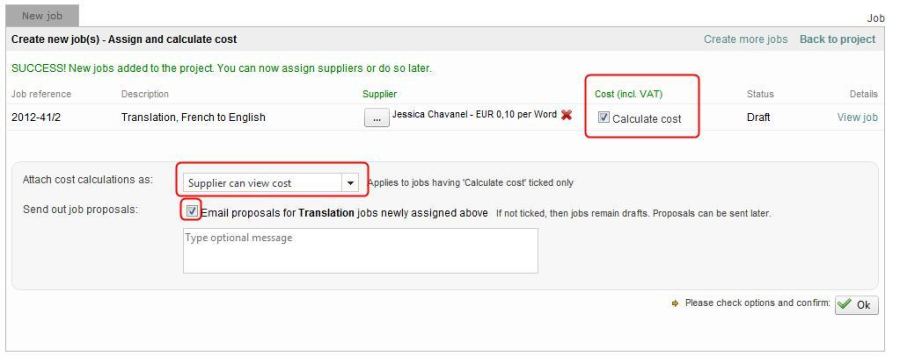
Choose if you want to calculate the cost and send a quote/ invoice to the supplier and if he will be able to view or not this cost. When all the parameters are set, click on Ok:
-
You will see a summary of your job: You can create more jobs, go back to the project or view the job:

-
Let's go back to the project. You will see the following screen:

-
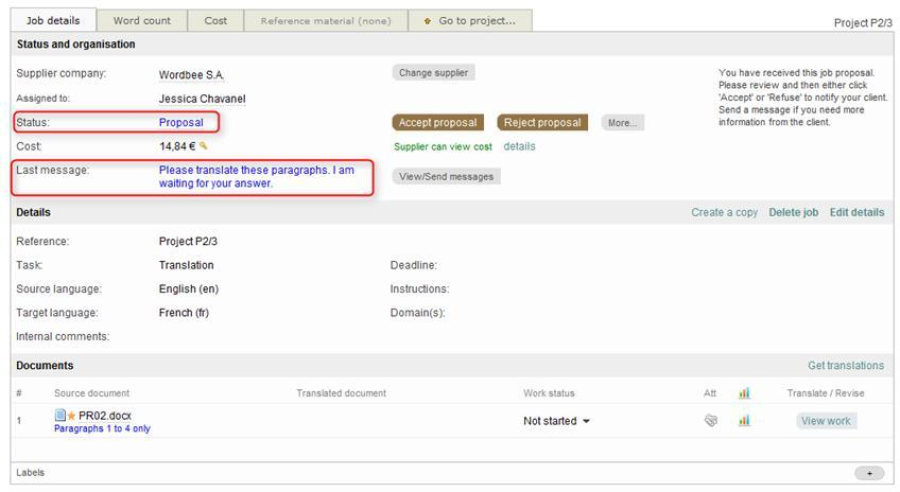
Click on Select to reach the job details page (also accessible by clicking on View job in the previous screenshot):

This page is divided into three parts:
-
Status and organization: show the name of the supplier who is going to do the job and the status of the job. In this section, you can change the status of the job, communicate with the supplier (view/send a message), see the details of the cost...
-
Details: gives a summary of the job: the name of the project, the task, the source and target languages...
-
Documents: gives the list of the documents to translate. By clicking on Get translations, it enables you to download the translated documents, which means when the translation job is completed.
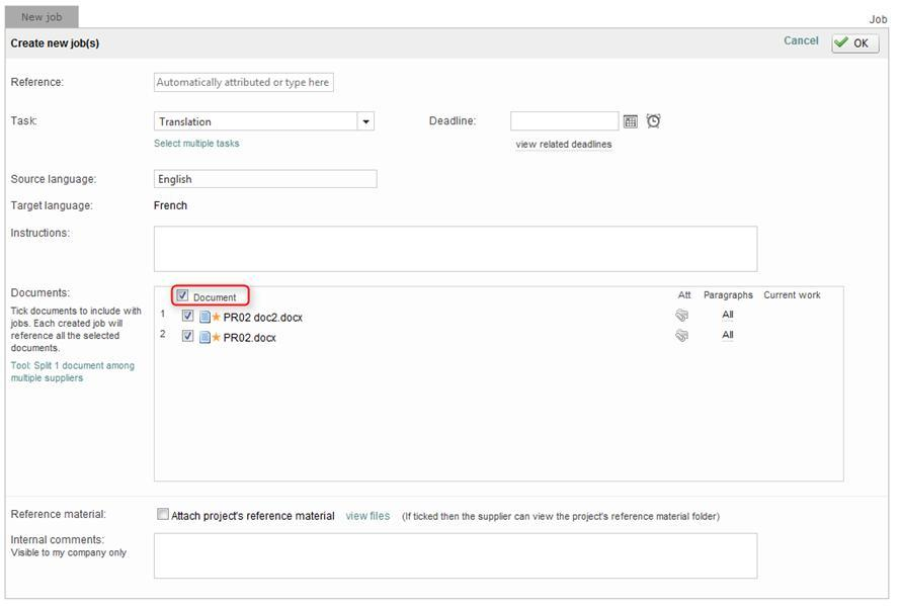
Scenario 2: The project includes one document but you want to split it between several suppliers:
-
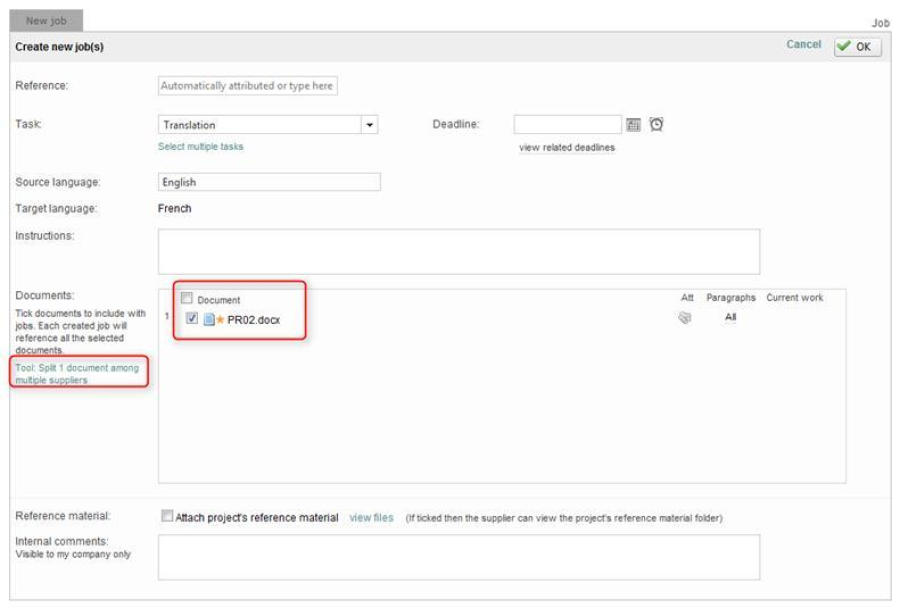
Select the document by ticking the corresponding checkbox. If you click on All, situated under Paragraphs, you will be able to define whether you want all the paragraphs of the document to be translated or only selected ones.
-
Click on Tool Split 1: document among multiple suppliers.
You reach this page:
There are three subsections:
-
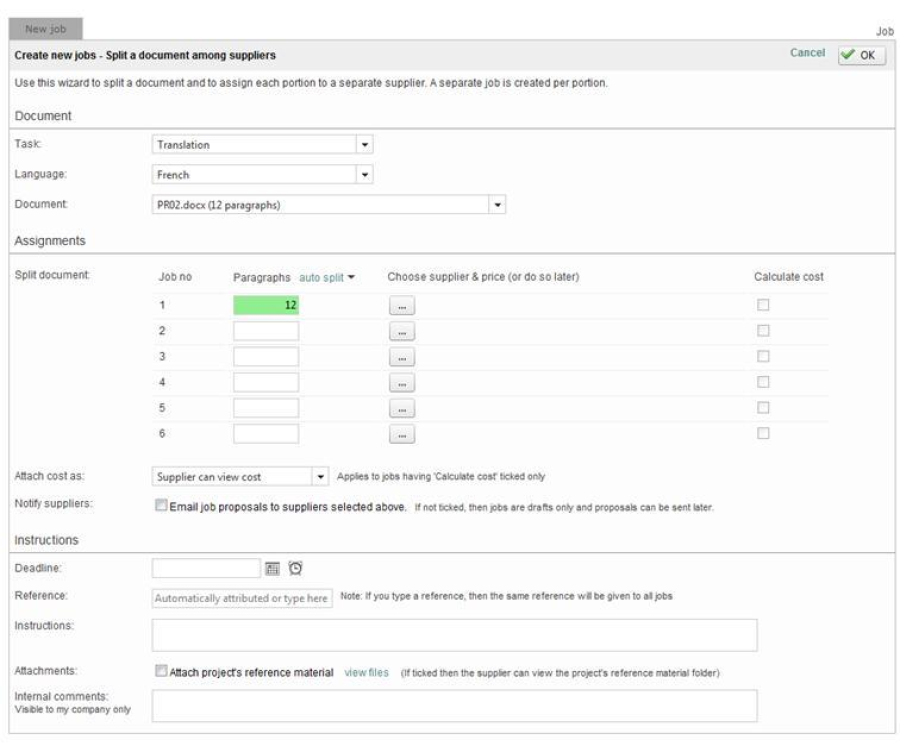
In Documents and Instructions, there are the same parameters as on the previous page: task, instructions, deadline... You can change them or set them if it is not already done. Besides, in the Document subsection, next to the name of the document, you can see the number of paragraphs it contains. In this case, there are 12 paragraphs.
-
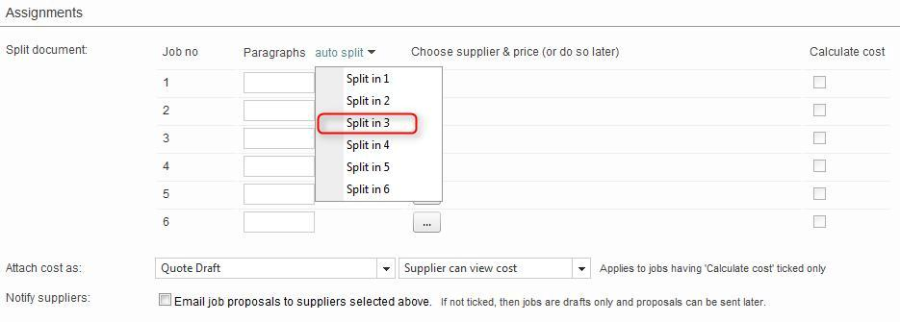
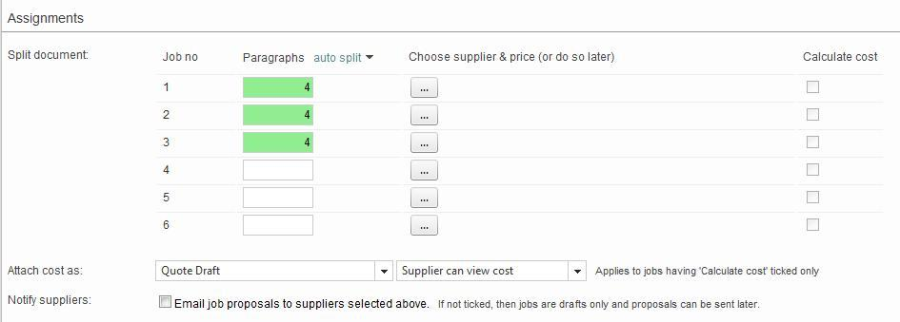
In Assignments, you split the selected document into one to six different jobs: you can either set manually the number of paragraphs you want each supplier to translate or you can set it up automatically by clicking on auto split.
Step 1
Step 2
-
Then, click on
to choose the suppliers for different jobs.
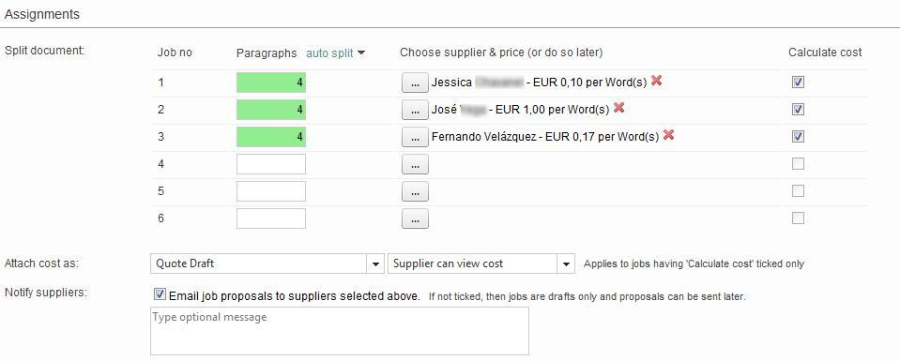
-
You can see that the Calculate cost a checkbox has been automatically ticked. You can then attach the quote/ invoice to the suppliers and let them view or not the cost. You can uncheck the box if you don't want to send anything yet.
-
You can tick or not the Email job proposals to suppliers selected above checkbox if you want to notify the suppliers right away. Otherwise, you can send the proposal later.
-
An email is thus sent to your supplier with your instructions and a link to connect himself/ herself to the Wordbee Translator interface.
-
Click on Ok when you are satisfied with the different parameters. You will see this screen:
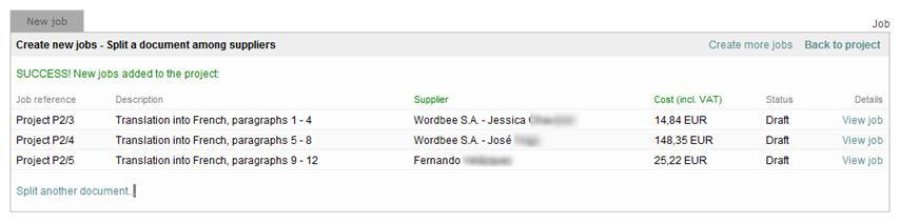
-
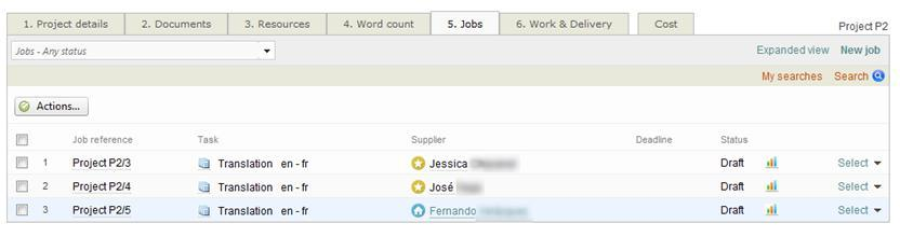
Click on Back to project to go back to the Jobs tab of the project:
-
Click on Select to reach the Job details page:
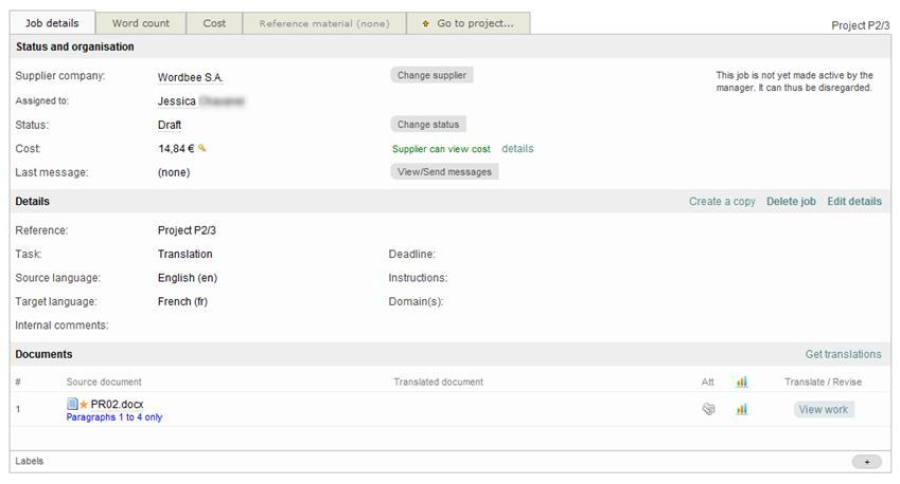
This page is divided into three parts:
-
Status and organization: show the name of the supplier who is going to do the job and the status of the job. In this section, you can change the status of the job, communicate with the supplier (view/send message), see the details of the cost...
-
Details: gives a summary of the job: the name of the project, the task, the source and target languages...
-
Documents: gives the list of the documents to translate. By clicking on Get translations, it enables you to download the translated documents, which means when the translation job is completed.
If you had not ticked the Email proposal... checkbox during the selection of suppliers, click on Send proposal (screenshot above).
-
Type in a message for your supplier.
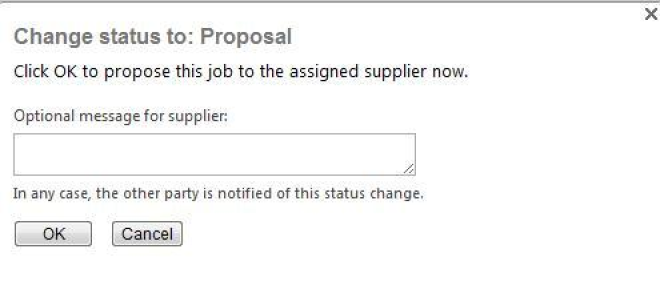
-
Click on OK. An email is sent to your supplier with your instructions and a link to connect himself/ herself to the Wordbee Translator interface.
-
The job status changes from Draft to Proposal.
The supplier can log on using his/her username and password and examine the nature of the job and deadline:
-
If the supplier agrees to do the job, a message is sent via Wordbee Translator to accept the contract. The project manager involved will also receive this email. In this case, the project status changes from Proposal to In progress in the Job details page.
-
If the supplier does not accept the job, the status would change to Proposal declined, the project manager will receive a message and you would have then to choose another supplier.
Scenario 3: There are several documents to translate.
-
If you want one supplier to translate them all, tick the Document checkbox to select them all at once and click on Ok, at the upper right of the page:
-
Then, follow the steps as in Scenario 1.
-
If you want to divide the different documents and create different jobs for each document, follow Scenario 2 without forgetting to select the document you want to split.
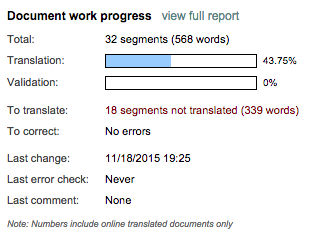
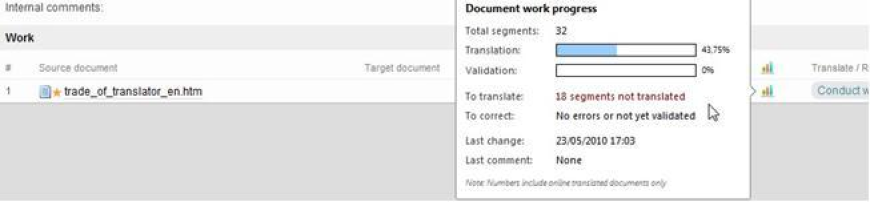
Note: If you want to see the translation's progress, click on 
You are now ready for Select a supplier for the job
5.1 Calculate Job Costs
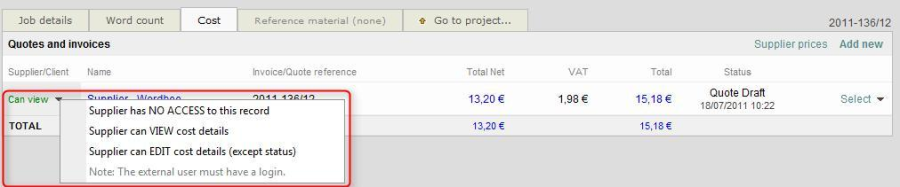
If you have selected the suppliers as seen in the Creating jobs section, everything has been automatically calculated and you will see that by clicking on the Cost tab after having selected the job for which you want to see the total cost:

-
On this page, you can see the Total cost which includes the Total Net + the VAT...
-
Select whether or not the supplier can have access to the record by clicking on the arrow next to Can view:
-
But, if for any reason whatsoever, you need to create a new quote or invoice, click on Add new.

-
Click on Continue. The Create new invoice or proposal page opens:
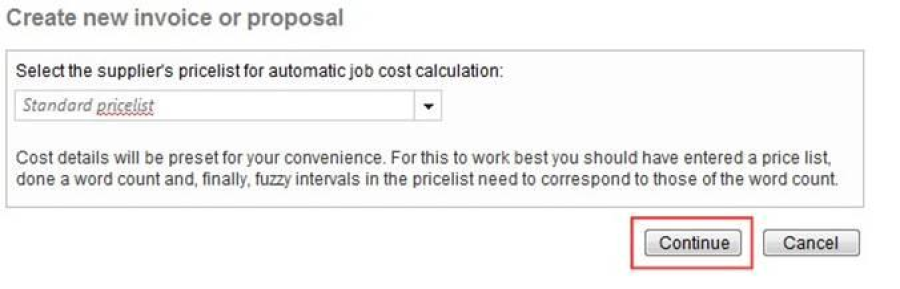
-
Click on Continue.
Wordbee Translator takes the word count into consideration. You are free to modify the prices and add or delete whatever you want by clicking on Edit. You can also modify the invoice VAT rate.
If you want to export all this data to Excel, click on 
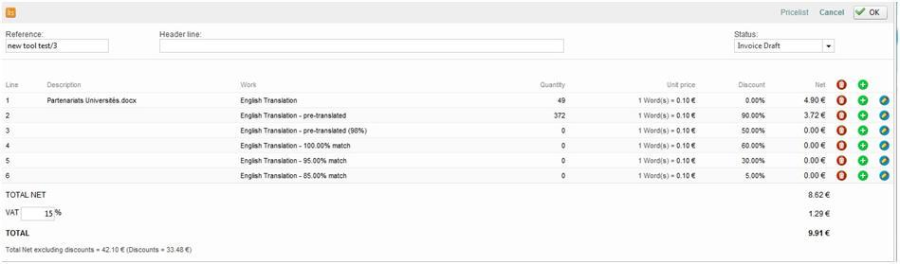
-
Validate your data and click on OK. You can now see the translation cost.
If you click on Supplier prices, it will open a page in which you can see the details of the supplier's prices:

6. Translating, Finalizing, and Delivering the Final Product
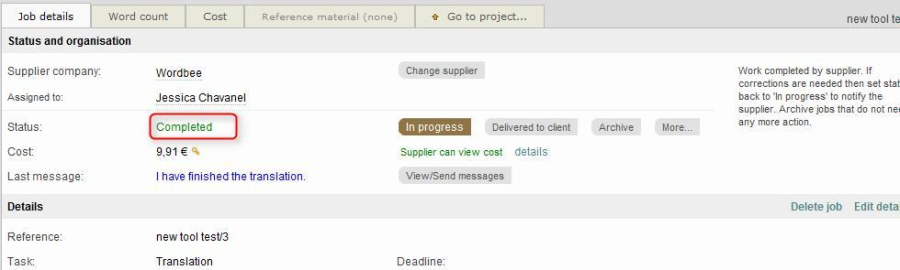
Once the translation is finished, the supplier marks the document as Completed. He/she can do it from the translation editor (see: The status bar) or from the job details page.
You can view the change in the Job details page (and also in the Jobs panel on the Wordbee Translator Home page and on the Project details page).
Once a file is translated, you can deliver it to your client at any time you want.
-
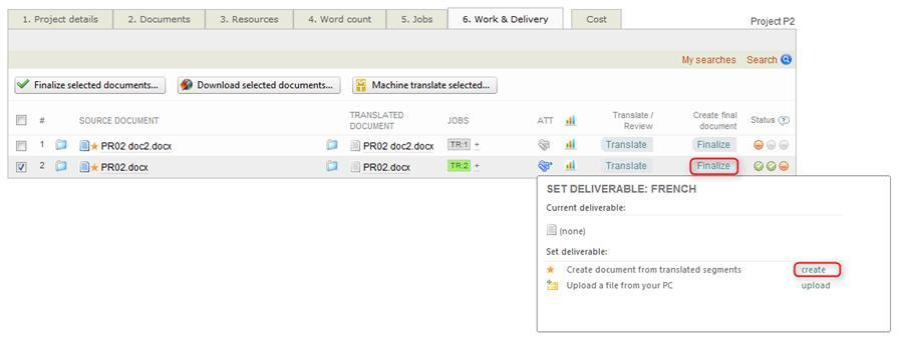
Click on the Work & Delivery tab:
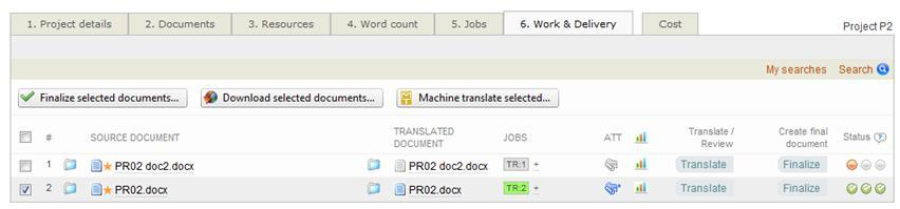
-
Other options available in the Work and Delivery tab:
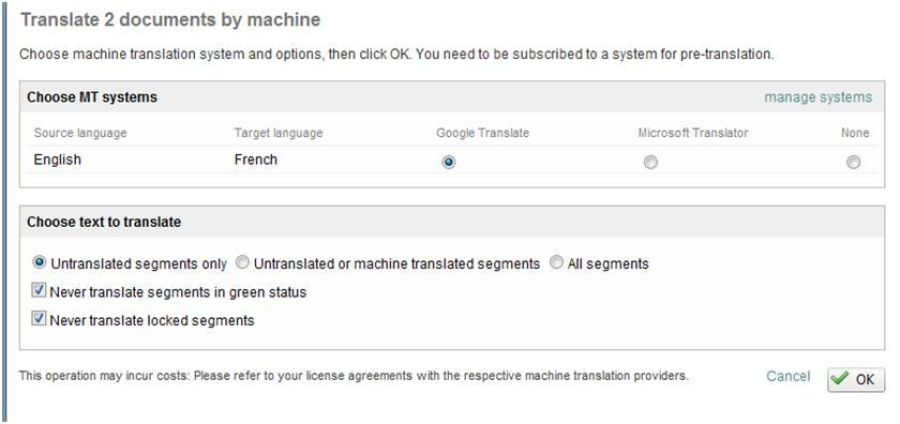
1)
: Click on this button to translate either all filtered documents or just the ones you selected by ticking the checkboxes on the left of the page. You will see this window
-
Tick your preferred MT system. If your project has multiple target languages you will be able to make a selection per language. If an MT system does not support a language couple, the option is disabled.
Upon completion, open the translation editor. Machine translated segments show up in brown colour and with a special "MT" icon:

2)(Soon) 
To finalize and deliver a project, follow these steps:
-
Click on Finalize and then on Create.
-
You will see this window:
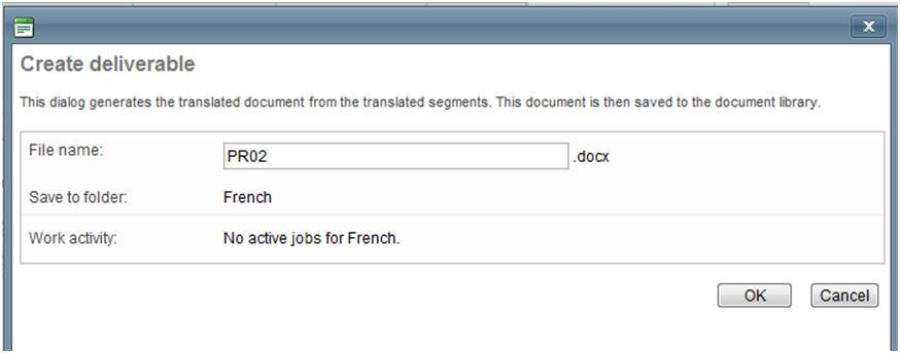
-
Click on OK. The document is converted to its original format and placed in its target language folder, available in the Documents tab.
-
You can also click on Finalize documents (

).
To download the document, there are two ways:
From the Work & Delivery tab:

By clicking on this icon, you will see this popup window:
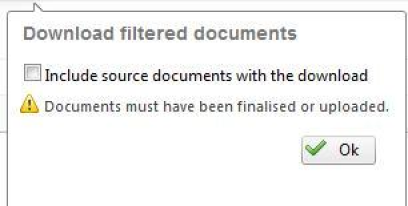
Click on OK after having ticked or not the checkbox and read the note under it. Or from the Documents tab.
To download the document to your hard disk, right-click on it.
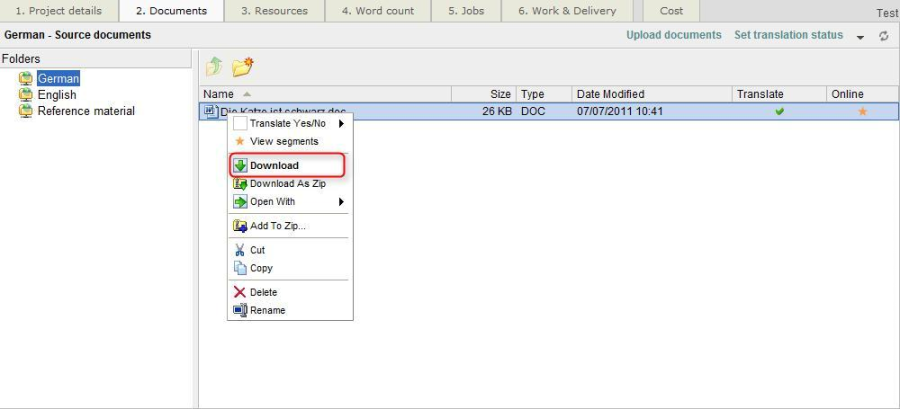
-
Click on Download.
-
Repeat the last two steps for all your documents.
If you have several documents, you can download them all at once by creating a zip file:
-
Click on Add to zip.
Note: You can also download the document via the Work and Delivery tab by left-clicking on the name of the document.
To see how the translation interface works, see the .