
This page has been provided to aid in entering basic information that is required on the new order form. For more detailed information about each option, please see Overview of new Order Form Settings.
When you create a new order form for use by clients and/or inhouse users, you will first need to enter the basic information for the form. This includes headers, help text, and additional types of information.
Please refer to the sections below for more information:
You also have the ability to configure custom options for the client or user to fill in on the form. For more information see Configure the Form User Options.
To get started please go to Settings > Client Portal > New Order Form and click on Configure. Then perform the necessary steps to Create a New Order Form.
This information will appear at the top of the order form (except the Terms and Conditions), as shown below:
Once you have created a new order form, follow the steps below to configure the basic form information:
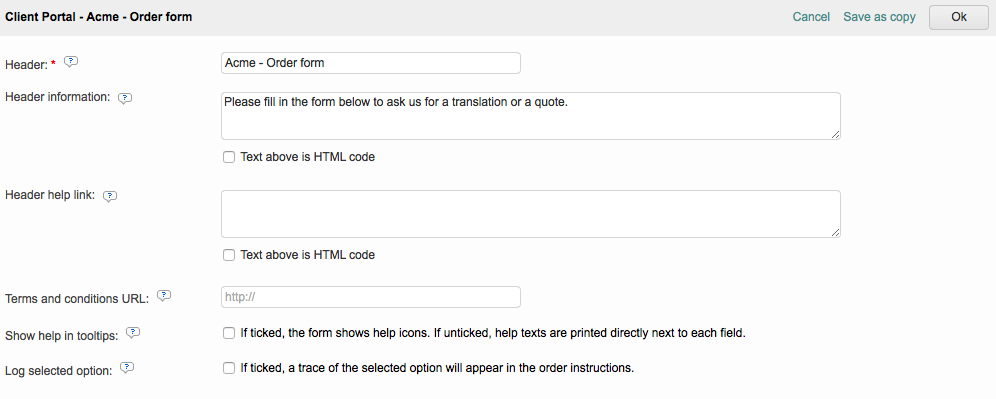
Form Header
The Form Header appears at the top of the order form and may display your company name along with additional information. By default, the system will populate a new form with this header Company Name - Order Form.

However, this may be changed to whatever text you desire by clicking on the field and typing the information. For example, you might want the client's name includeded on the form for easy identification when assigning the form to that client.
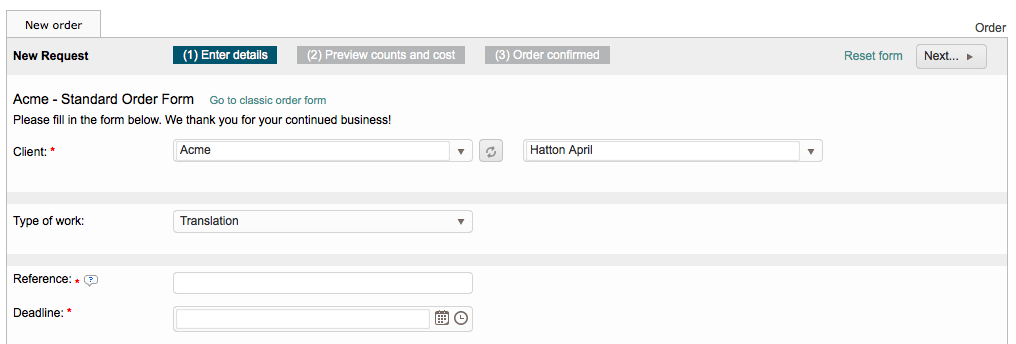
In the example below, Acme is the name of the client and the form header has been changed to Acme - Standard Order Form.

Besides entering or changing the Form Header, you also may add descriptive text within the Header Information section to appear beside this information on the form. Default text is provided, but may be changed when needed.
For example, you might want to customize this message to include the client's name or add another type of tailored message with further instructions. The text may also be marked as HTML when applicable.

To change the descriptive text for the header, click on this field and then type the desired text. If the text is HTML code, tick the checkbox next to the option titled Text above is HTML code.

Additionally, you may also enter Help Text to appear on the header of the form to assist client's with this process. This information may be entered in the text box for the Header Help Link option.
Your clients will see this text when they click on the Question Icon next to the Form Header. The text may also be marked as HTML code if needed.

Terms and Conditions URL
Another part of the basic configuration involves entering a Terms and Conditions URL for the client to accept your companies terms and conditions before submittng the form. This is an optional configuration setting and not required by default.

To enter the URL for your companies terms and conditions, click on this field and type the full URL including http:// or https://.

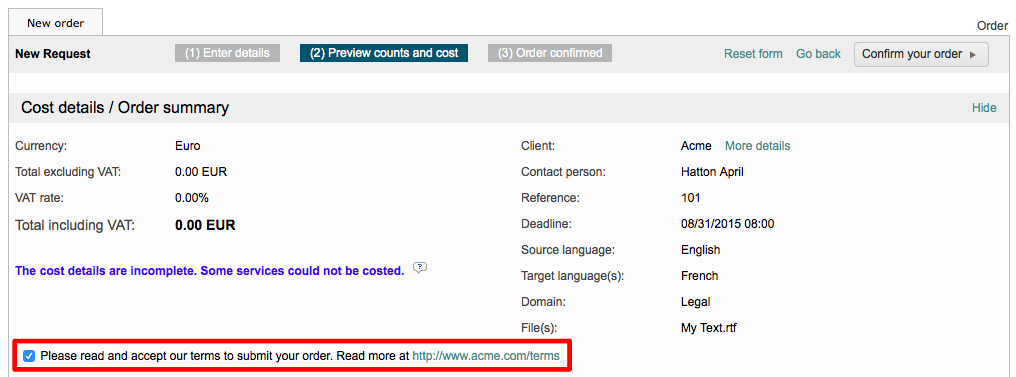
When you enter a Terms and Conditions URL, an additional option will appear for providing a Terms and Conditions Message to the client. Click and type to enter text such as instructions or other information. The text may be marked as HTML code if needed.

The client must accept your terms and conditions on Step 2 of the ordering form in order for the request to be confirmed and submitted. You will see a checkbox titled "Please read and accept our terms to submit your order. Read more at (provided URL) ", which must be ticked to advanced to Step 3. The URL is displayed as a help link to the right of this option.
If it is not ticked, the client will receive an error on the order form:

Show Help in Tooltips
The Show Help in Tooltips option, when enabled, places a help icon (question mark) to the right of the form option name. When the client clicks on the Help Icon they see additional information about that option, which will either be default text or text you have specifically entered as a help message for that option. This option is enabled by default.

When the Show Help in Tooltips option is disabled (unticked), all entered help messages will be printed next to each field. To disable this option, click on the checkbox to the right of the option name. It will not have a checkmark and blue background when disabled.

Please remember to keep help messages short when this option is disabled.
Log Selected Option
When configuring a new order form, you are able to add customized options for the client to select on the form. There is no limit to the number of options and the Log Selected Option ensures that each selection made on the order form is viewable within the order instructions. It is disabled by default in the form configuration.

To enable this option, tick the checkbox and it will have a checkmark with a blue background to show that it has been enabled.

For more information about creating the actual options that will be logged in the order instructions, please see Configure the Form User Options.