
For project managers, a few preliminary tasks might need to be performed prior to beginning project creation and job assignment. If you have existing terminology databases, it is beneficial to import them into Wordbee Translator.
Several file types are supported and the following sections will show you how to import a new terminology database (i.e. glossary). A terminology database may also be imported into an existing one within the system.
Please see the following sections to learn more:
A glossary may be imported separately or as part of an existing glossary in the system.
How to access the Terminology databases
To view current glossaries in the system, click on Resources in the top toolbar and then choose Terminology databases from the drop-down menu.

Current terminology databases in the system will appear in a list format, as shown below. You may import a new glossary by clicking on Add New.
To import into an existing one, click on Select to the right of the desired terminology database. The process will be the same with exception of a few different option selections, which will be explained further in this page.

If importing into an existing terminology database, click on Import in the upper right of the screen after selecting a terminology database in the system.

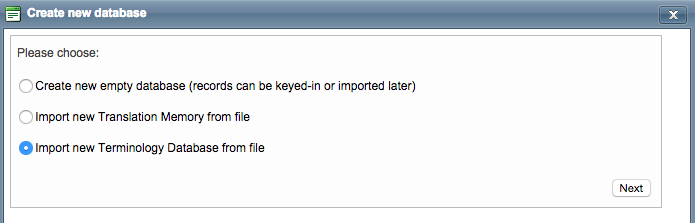
Step 1: Choose a Resource
If you are importing a terminology database that will not be part of an existing one in the system, then you will need to first pick the resource for the import. Tick the radial next to the Import new terminology database from file option. Then click on Next.
If you are importing into an existing terminology database, Step 2 will be the first step in the process.
Step 2: Select a File Format
Wordbee Translator supports multiple terminology database file formats: TMX, Excel, CSV, Open Office Calc, Align Assist Files, and TBX. You will need to choose the appropriate file format by ticking the radial next to its name. The format must match the file selected for import in Step 4.
To make a selection, click on the radial next to the desired format and then click on Next.
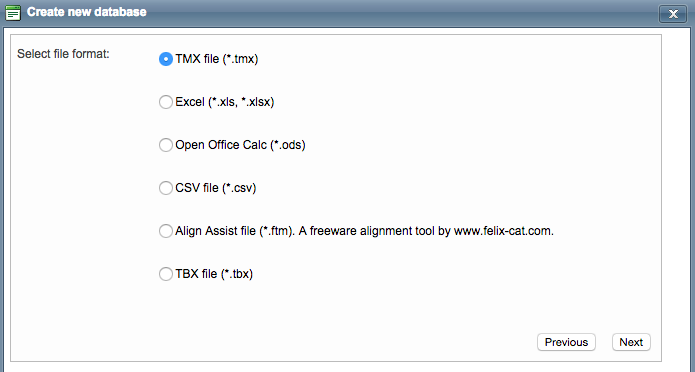
For TMX, Align Assist, and TBX files, you will immediately be asked to select the file after choosing the format. This is covered in Step 4.
CSV and Excel files will have an additional configuration step for defining what columns and rows correspond with source/target languages, comments, etc. This is covered in Step 5.
Step 3: Select Languages & Configure Name
Next, you will need to configure the source language and target languages for the terminology database. Use the Source Language drop-down menu to choose the source language. Then tick the checkbox next to each Target Language you would like to be part of the terminology database.
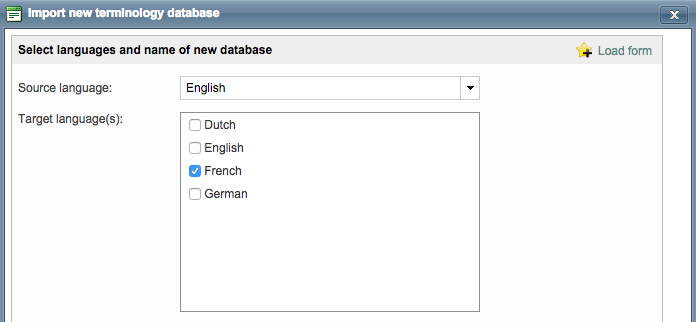
A name must also be entered for the terminology database. To do so, click on the Resource Name field and type in a relevant name. This could be a combination of the client, product, languages, etc. An additional section is provided to add additional Comments for further reference. When finished, click on Next.

Step 3 will only appear when importing Excel, CSV, and Open Office Calc files. Source and target language selection for Align Assist, and TBX files occur in Step 6.
Step 4: Select Your File
The next step involves selecting the file that will be imported for the terminology database. Click on Select to locate and select the appropriate file. Click on Next to continue.
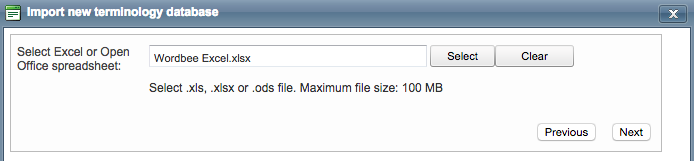
The chosen file should match the file format you selected in Step 2.
Step 5: Configure Sheets, Columns, & Contents
If the file format is an Excel or CSV file, you will be required to configure a few additional items:
-
Import Sheet - If the file has multiple sheets, you may click on this drop-down menu and make custom selections for sheets to be included in the import. By default, only the first sheet is selected.
-
Header Line - This option is disabled by default meaning that the first line is not header or title information. If this information exists in the file, then tick the box to enable this option.

The next step involves selecting a column for the source language, each target language, comments, etc. To do so, click on the drop-down menu and choose the corresponding column for each as defined in the import file.
In the example below, English (Source) is Column A and French (Target) is Column B. There are no other columns in the file.

If your file contains other columns to be imported, you can create new information categories as custom fields. Learn how to do it in Creating Custom Fields
Step 6: Configure Filter Options
By default, the configuration is set up to skip mono-lingual (not translated records). You can untick this option if mono-lingual records need to be included.
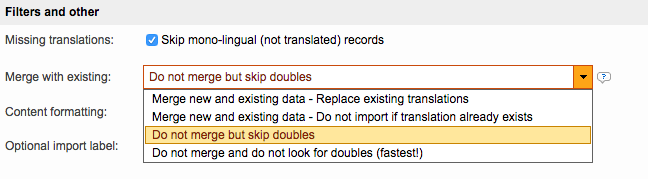
The Merge with existing the option determines if the imported file will be merged or not with an existing glossary. If the terminology database is being imported for the first time, then you will want to select one of the Do not merge options.
However, if the terminology database has been previously imported or is being imported into another terminology database, the Merge new and existing data options are appropriate.
If you are importing file types such as TMX or TBX, you will see the above options along with a few other configuration choices. For example, you will select target languages, but not on a separate screen. They will be selected here instead of by ticking each desired checkbox. In the example below, only one target language is available.
Additionally, you have the option to import inline tags, remove them, or replace them with blanks in the terminology database. By default, they are imported and you can tick the radial for the desired option to change this configuration.
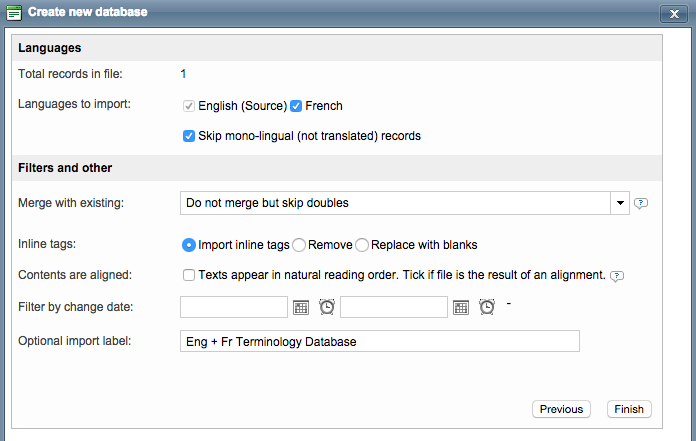
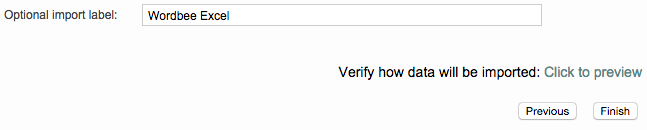
Optional Import Label will essentially be the name used for the import. To change this information, click on the text field and type in the desired information.
For Align Assist Files, the option titled "Contents is aligned" will need to be ticked.
Step 7: Preview and Finish
Wordbee Translator provides the option to preview the data prior to importing. Use the Click to Preview link to open a browser and view this information. Once all configuration steps have been completed, click on Finish to complete the terminology database import.
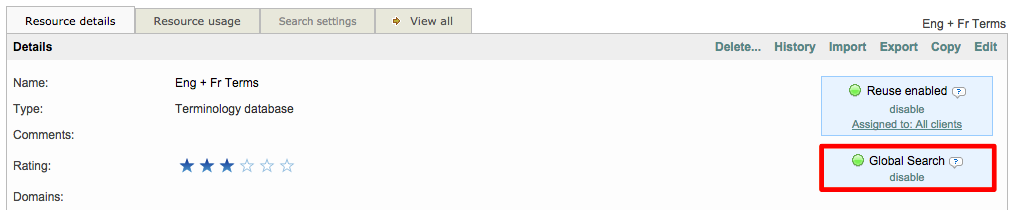
It will appear as shown below from the Resource Details Tab:
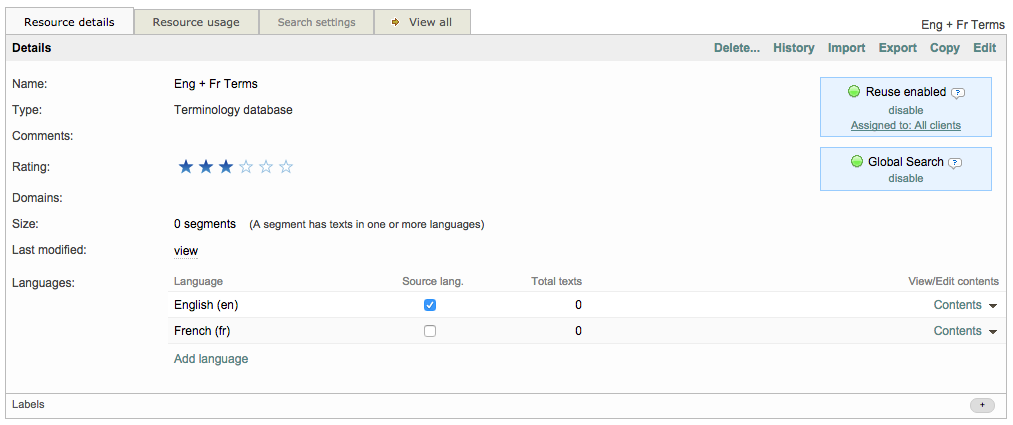
Once you have imported the terminology database, many more actions can be taken and are displayed at the top of the Resource Details Tab. You may delete, copy, or edit the TM as well as view its history or export it to your computer.

To access the Resource Details for a glossary, simply click on Resources, click on the Resource Details Tab, and then click on Select to the right of the desired database.
The Reuse feature is enabled by default for all clients and allows the terminology database to be used again in the system for a specific client or all clients. If a terminology database is reusable, it will have a green circle when viewing it in the system resources.
You may disable this option by clicking on Disable or click on the Assigned to option to change who it can be reused for.

Global Search is a feature for finding words, segments, etc. throughout the entire system without having to access each individual location (see here). It is enabled by default for an imported glossary. If it should be disabled, simply click on Disable.
Learn more
See the Terminology Management User Guide to learn how to manage your terminology.