
A Codyt Project can be set up to be fully automated when using the new order form; however, if you have set it up differently, a few tasks might need to be done manually. The following sections provide insight on what steps are required when managing orders in both ways:
Fully automated orders
The new order form saves a lot of time, because you get to configure everything upfront so that when the form is submitted, it is already taken care of in the system. When an order is submitted in this way to generate a CoDyt Project, managers can reduce all manual interaction with the processing of the order to 0. The request received will automatically generate the project, the dispatching and the cost calculations can be done internally by the system and the final delivery once the workflow has been completed can also be automated. See a sample of this scenario right below:
|
Request received |
Final delivery |
|---|---|
|
|
|
This full automation behavior has been configured for all related options in the order form and the workflow template(s)). Read below for more details:
Prerequisite 1: Configure the workflow templates
You will need to define the automation options you wish to be ran in the background by the system.
For example, you can automatically create any quote/invoice related to the jobs, generate the final deliverables and update the status of the related request automatically.
Prerequisite 2: Configure the Order Form options
By using the order form, you will be able to preset the services and fees to be costed to your clients, if you wish to automatically generate a quote/invoice.
For example, each option in your form can contain a fixed set of tasks (analysis, project management costs, etc.)
Semi-automated orders
If you have decided to use the order form to automatically create the projects but you wish to keep control of supplier costs and the results to be delivered, your request will appear as shown below:

In this scenario, the following tasks have already been completed:
-
Project Creation & File Copying
-
Marking Documents for Translation
-
Cost Calculations and invoice generation for the client
-
Job Creation and Assignment
All you need to do is complete the following three steps after the work has been completed and reviewed:
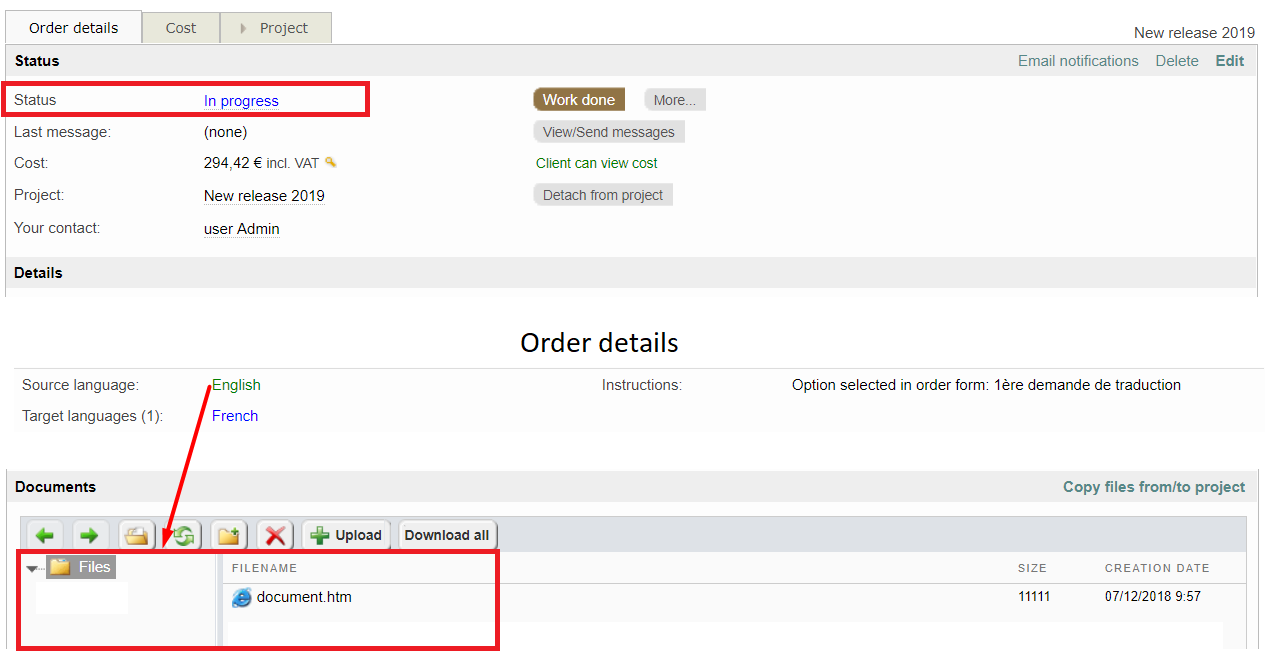
Step 1: Finalise the Translations
For fully automated CoDyt project orders, the most of the work is done for you! After the job has been accepted by the supplier and the work has been completed for the project, all you need to do is finalise the translations.
This is done from the Status Tab when viewing the project. In the Finalise Translations section you will generate the final files of the project. This tab shows each translation that needs to be finalised for the project. To finalise a translation, click on Finalise Now and then click on Confirm in the pop-up window.

To learn more about finalising your translations for a CoDyt project, please see the Finalising Translations page in the Getting Started Guide. You can also decide to automate this process in the workflow template, so the final files are generated once the last supplier in the workflow completes his job.
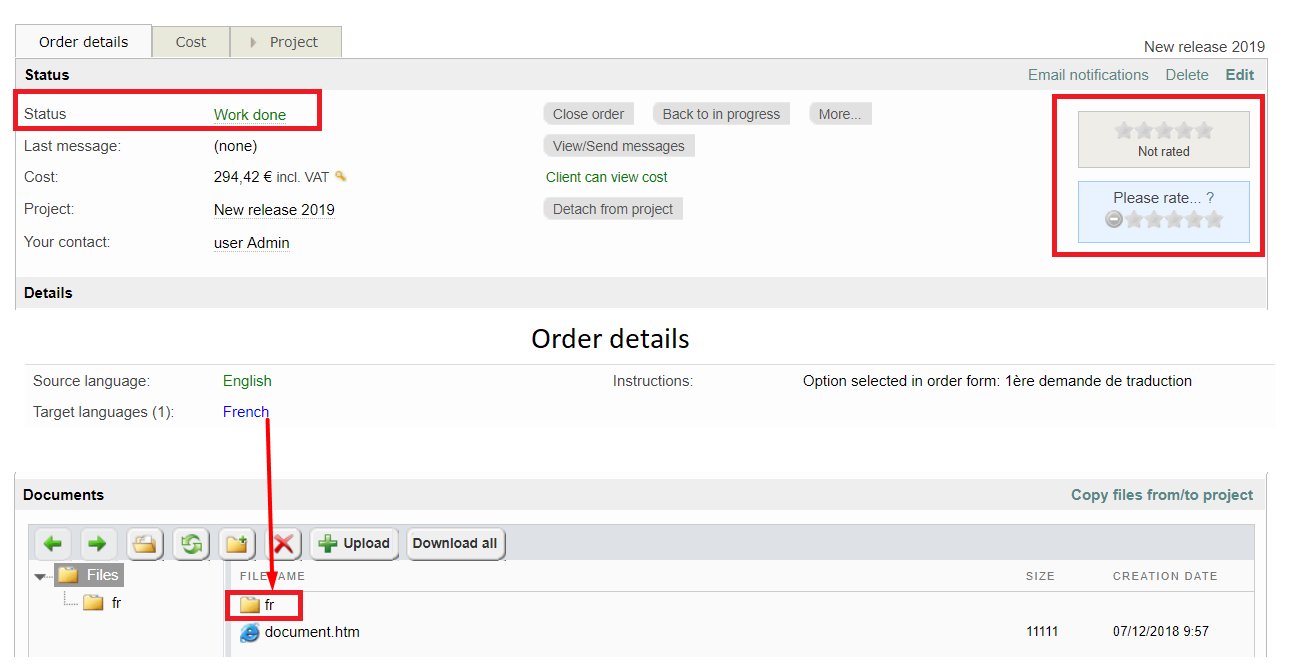
Step 2: Copy Files from Project
After the completed translations have been finalised, the finished documents must then be copied from the project to the order. To do so, complete these steps:
-
Click on Orders.
-
Click on Select for the order.
-
Then scroll down to the Documents section of the Order Details Tab.
-
Click on Copy files from/to project.
-
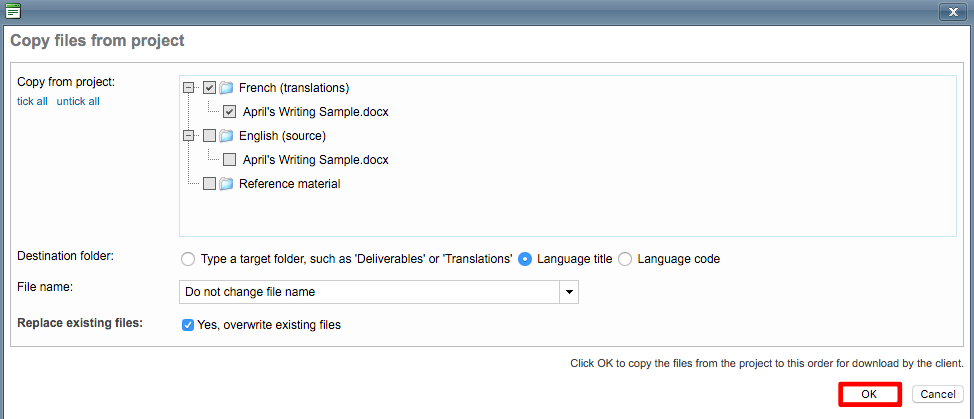
Click on Copy files from project in the drop-down menu.

Choose the files you would like to copy from the project by ticking the checkbox next to each file name. You may also configure the destination folder, change the file name, and disable the option for overwriting existing files. Once finished, click on OK.
Folders for each language will be added in the documents section and you will be able to see each file that was copied from the project. Once this step is completed, you will be able to mark the work as done so the client can review the work and approve it.

The transfer of files from the project to the client request page can also be automated in the workflow template, so you are able place that final file in the order library once the last supplier in the project workflow completes his job.
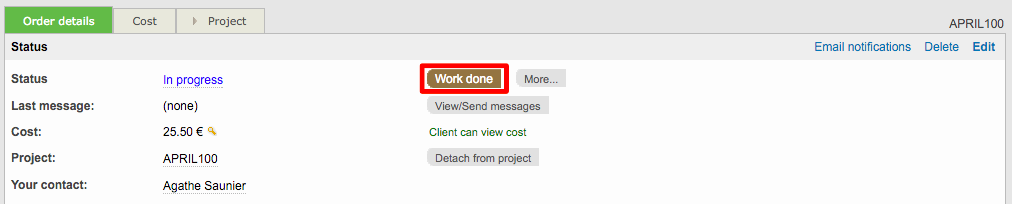
Step 3: Mark Order as Done for Client Approval
On the Order Details Tab, click on Work Done to send the completed work to the client for review and approval.
The workflow templates also allow you to keep the project and order status aligned, so you are able to update the order status when the project is completed. This will also send a notification to all users involved in the order, including the ones on the client side. Note this notification is only launched once the project is completed (the results for all languages are delivered).
After the work has been marked as done, you will have the option to provide a rating. More information can be found in the User Ratings section.
Manual order management
When minimal automation is configured for a CoDyt project in the new order form, the steps are quite similar to what you would need to do when an order is submitted through the classic order form for a new client, except the client does not have to be added because they already exist in the system.
You will need to complete the following tasks to manage an order where automation has not been configured in the new order form:
Step 1: Create a Project for the Order
If the project has not been configured to be created automatically, then you will need to create it in the system and copy the documents from the order to the project. On the Order Details Tab, click on the option titled Attach to project... to associate the order with a project.

Tick the radial next to Create Codyt Project in the pop-up window. Enter a project reference if desired, select a template if one is available in the system, and choose the pricelist to be used for cost calculation. Then click on OK to finish.
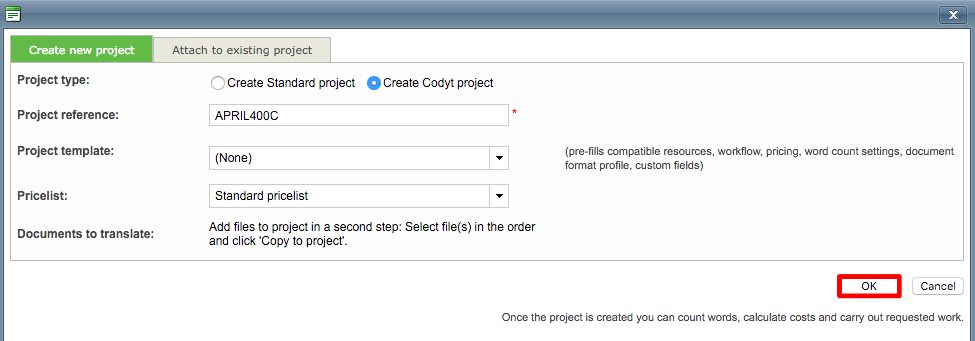
The Order Details Tab will now show "Detach from project", as a project is now associated with the order.

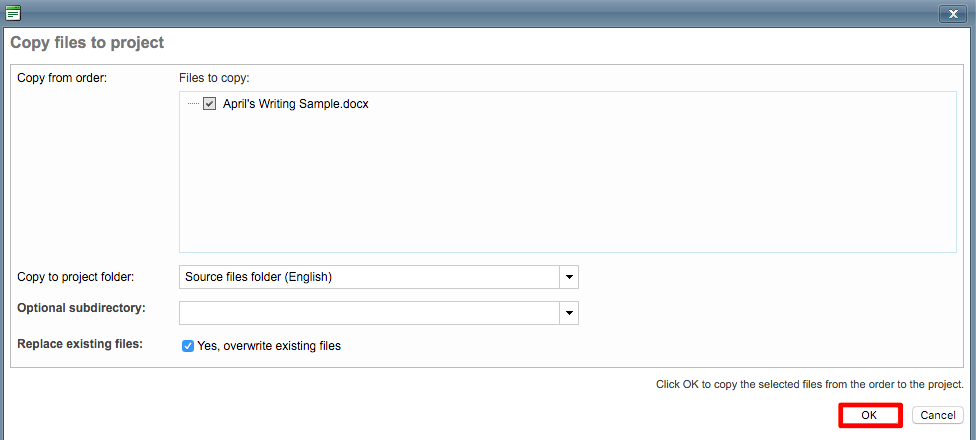
Step 2: Copy the Documents to the Project
After the project has been attached, the documents need to be copied to it so they can be marked for translation, word counted, etc. Scroll down to the Documents Section of the Order Details Tab. Then click on Copy files from/to project and choose Copy files to project in the drop-down menu.

Select the files you want to copy and then click on OK to close the pop-up window and finish copying.
Step 3: Mark Documents for Translation
To mark each document for translation, you will need to do the following when viewing the order:
-
Click on the Projects Tab.
-
Click on the Documents Tab.
-
Right click on the document.
-
Choose Translate Yes/No and Mark for Online Translation.
-
Click on Next in the pop-up window.
-
Make any configuration changes for language, workflow, text extraction, etc.
-
Click on OK.
When these steps are finished, the document will have a green checkmark in the Translate column and a start in the Online column (if translating online).

For more information about marking documents for translation in CoDyt Projects, please see the Upload your documents page in the Getting Started Guide.
Step 4: Set Cost & Create Quote
The client will already have a default pricelist in the system since they have previously submitted orders. For the project, you will need to do the following when viewing the order:
-
Click on the Projects Tab.
-
Click on the Counts and Cost Tab.
-
Tick the checkbox for each document that needs to have the cost set.
-
Click on Set cost selected...
-
In the pop-up window, tick the checkbox for each document.
-
The click on OK (# lines) to finish.
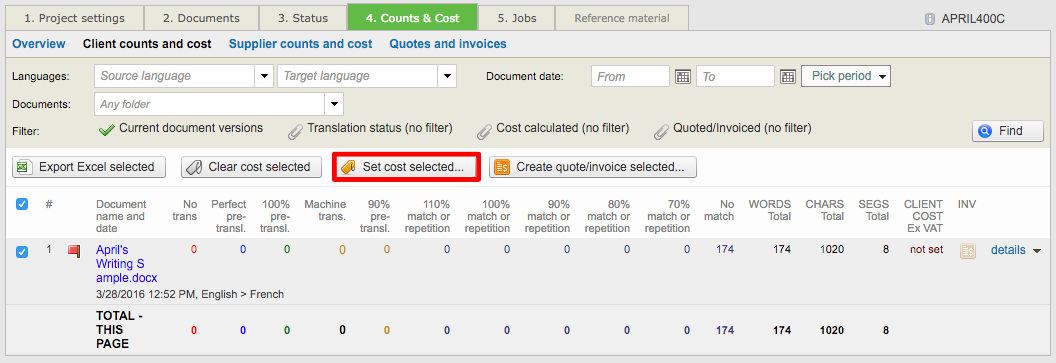
The document will now show the cost based on the number of words and pricelist information. The next step will be creating an quote for the proposal to the client.
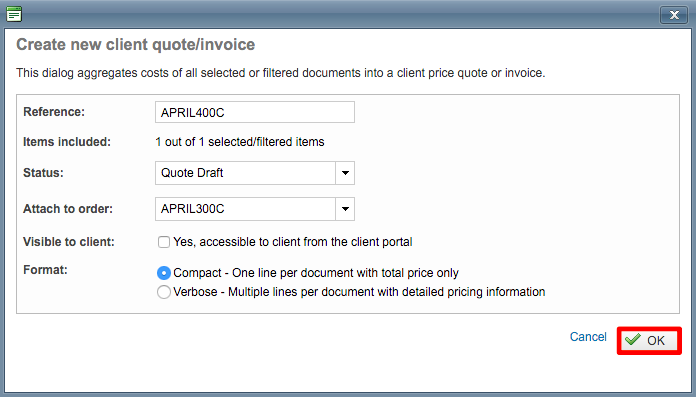
-
Tick the document again to create a quote draft for the client.
-
Click on Create quote/invoice selected...

-
Make certain Quote Draft has been chosen in the pop-up window.
-
Enable the client to view the quote (if needed).
-
Then choose the format (Compact or Verbose).
-
Click on OK to finish.
Once the quote draft has been created, you will be redirected to the Quotes and invoices section on the Counts & Cost Tab. Here you can change access settings, review quote information, make any necessary edits, etc.
To view the quote, click on Select and a new pop-up window will appear. You may also attach the quote so that the client can view or edit it in the client portal.
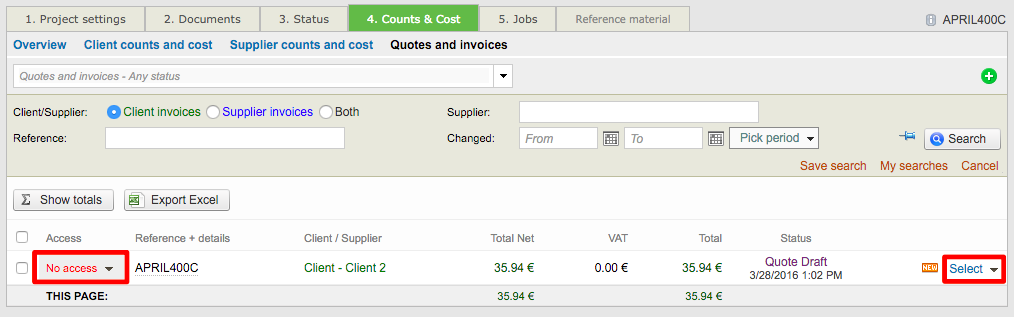
For more information about managing quotes for CoDyt projects, please see the Client costs in Codyt projects page in Managing Quotes & Invoices.
Step 5: Send Proposal
Now that the cost has been calculated and a quote exists in the system, you are ready to send the client the proposal. Click on Orders in the Menu Bar and select the order. The cost will now appear in the Order Details Tab and the invoice can be viewed from the Cost Tab.
Click on Send Proposal and enter a message (if desired) in the pop-up window. Click on OK to close the window and send the proposal.

Once the proposal has been accepted, the Order Details Tab will appear as shown below:

Step 6: Propose/Assign Jobs
Next, you will need to propose or assign project jobs to suppliers. Since this is a CoDyt project, the jobs will be created automatically based on the defined workflow. However, they will need to be manually assigned or proposed unless configured differently in the new order form. To do this,
-
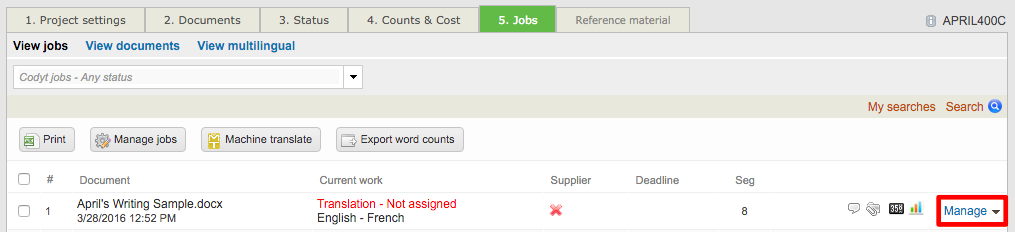
Click on the Jobs Tab when viewing the project.
-
Then click on Manage next to a job.
-
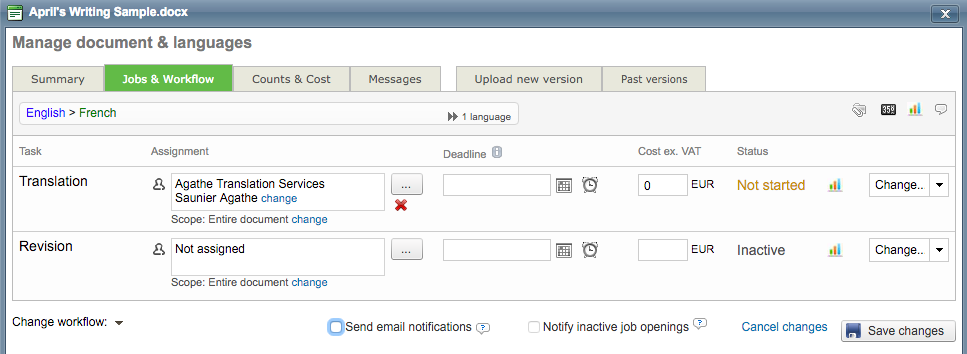
Click on

-
Choose an individual supplier or propose the job to a group of suppliers.
-
Make any additional changes such as entering a deadline, entering cost information, or changing the job status.
-
Then click on Save Changes in the pop-up window.
For more information about proposing and assigning jobs to suppliers, please see the How to modify the workflow in an existing project page in the Getting Started Guide.
Learn how to preview costs and estimate delivery for suppliers before assigning them jobs or even how to generate the final invoices for their activity in the dedicated pages.
Step 7: Create an Invoice
After the proposal has been accepted and the completed work has been reviewed, you will need to generate an invoice for the client in the system. This can be done by completing the steps below:
-
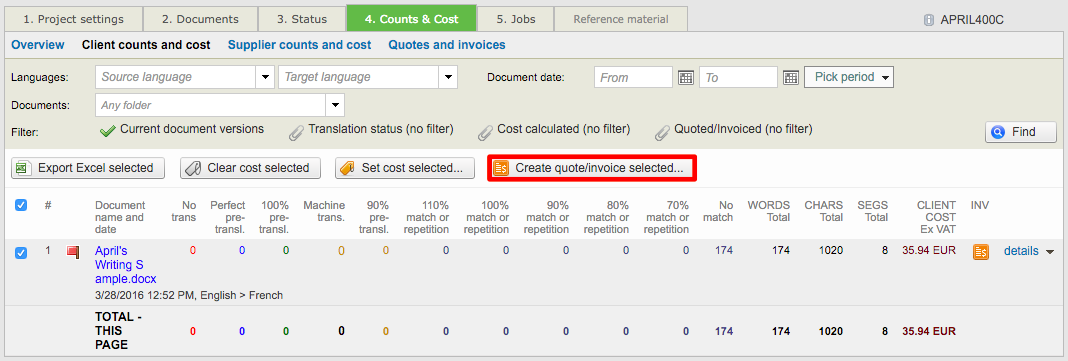
Click on the Counts & Costs Tab when viewing the project.
-
Click on Client counts and cost.
-
Tick the checkbox for the document(s).
-
Click on Create quote/invoice selected...
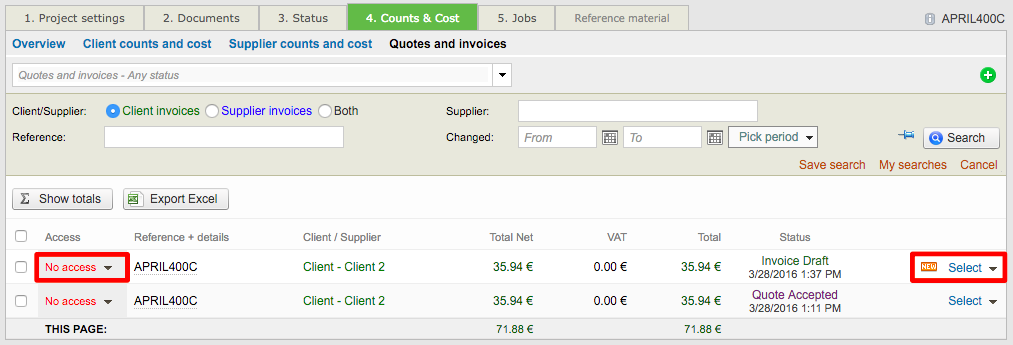
Next, choose Invoice Draft for the status. You can enable client access for viewing through the client portal and choose a format (compact or verbose). Click on OK to finish.
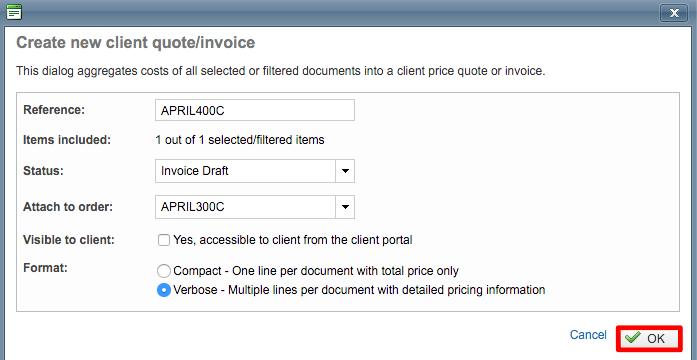
You will be redirected to the Quotes and Invoices section of the Counts & Cost Tab. To change access rights for the client, use the drop-down menu underneath the Access Column.
Click on Select to view and/or edit the invoice as well as attach it for viewing and downloading.
For more information about generating invoices and attaching them to the project, please see the Client costs in Standard projects page in the Getting Started Guide.
Step 8: Finalise Translations
As with an automated ordering process, the completed translations will need to be finalised. Click on the Status Tab when viewing the project and then click on Finalise Now next to each finished translation.
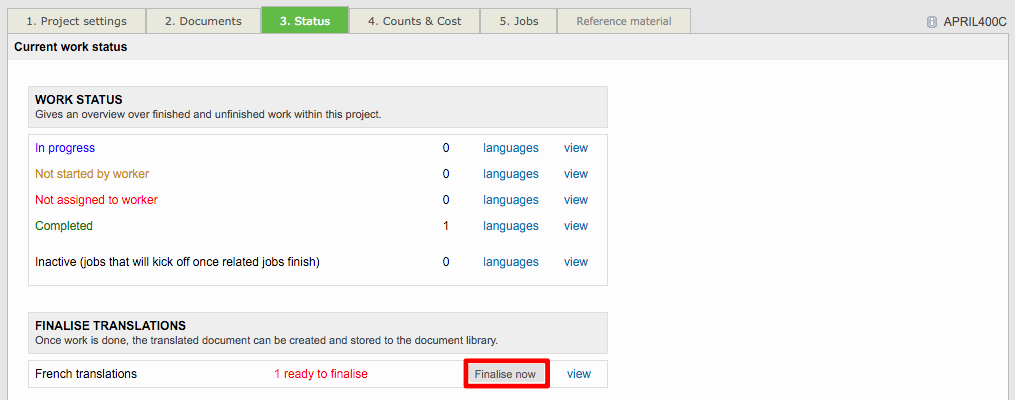
To learn more about finalising translations, please see the Finalising Translations page in the Getting Started Guide.
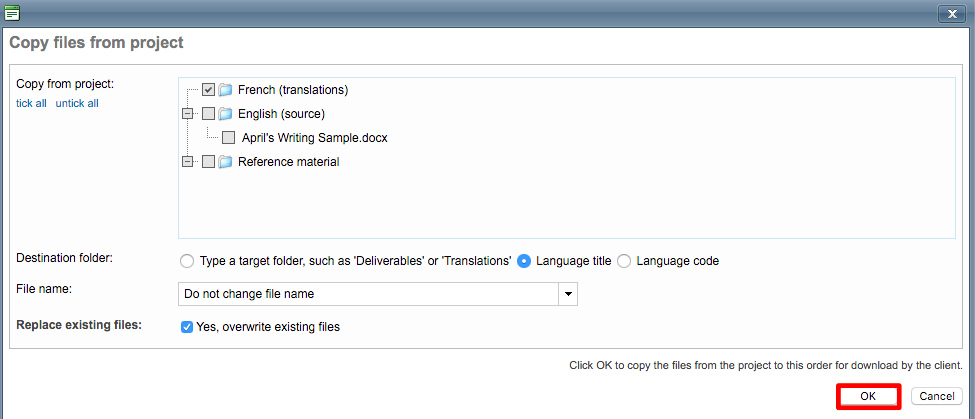
Step 9: Copy Files from Project
After all other steps have been completed, you will need to copy the project files to the order. To do so, complete these steps:
-
Click on Orders.
-
Click on Select for the order.
-
Then scroll down to the Documents section of the Order Details Tab.
-
Click on Copy files from/to project.
-
Click on Copy files from project in the drop-down menu.

Choose the files you would like to copy from the project by ticking the checkbox next to each file name. You may also configure the destination folder, change the file name, and disable the option for overwriting existing files. Once finished, click on OK.
Folders for each language will be added in the documents section and you will be able to see each file that was copied from the project. Once this step is completed, you will be able to mark the work as done so the client can review and approve it.

Step 10: Mark Order as Done for Client Approval
On the Order Details Tab, click on Work Done to send the completed work to the client for review and approval.

After the work has been marked as done, you will have the option to provide a rating. More information can be found in the User Ratings section.