
When setting up a file format configuration for XLIFF files, there are many options to choose from to ensure extraction is successful. This page will explain configuration options for XLIFF files in Wordbee Translator.
Remember
Wordbee supports many of the XLIFF 2.0 features. Read all the details in the dedicated page with XLIFF 2 information.
To view and edit the XLIFF filter options, go to Translation Settings > Document Formats and select XLIFF files. The XLIFF files - Configuration window opens. Here you can configure the following:
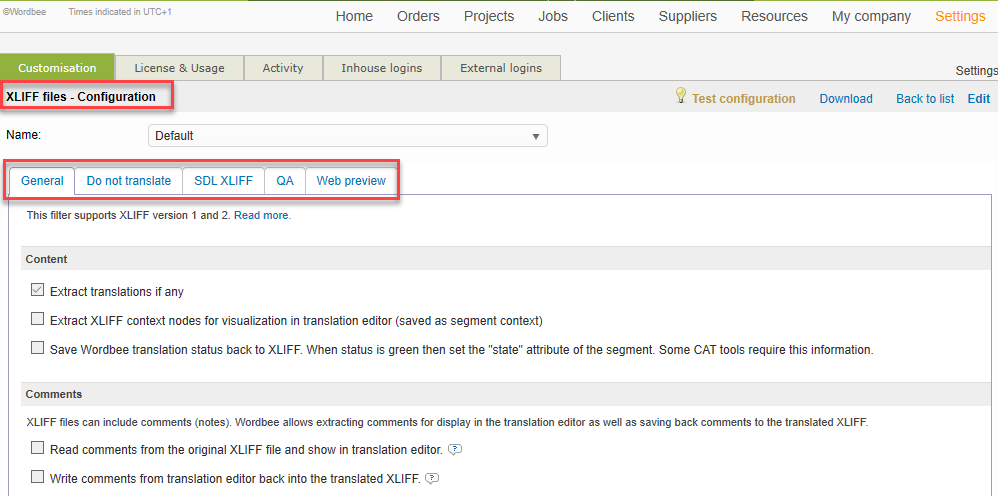
General settings
The General tab contains options for extracting content, defining the file as HTML, handling whitespaces and symbols, excluding content, and text segmentation. The options are described below:
-
Content - Extract XLIFF existing translations (if any) and set segment status to 'Translated' in the translated XLIFF file.
-
Comments - Extract XLIFF notes on segment level to Wordbee comments and write new comments added during translation work in the translated file.
-
HTML Content - Inform the system that the content is HTML, set up a configuration for HTML extraction, and split text at HTML break tags.
-
Whitespaces and Symbols - Do not show leading and trailing whitespaces, do not show preceeding and trailing markup, do not translate texts containing neither letters or digits, and always preserve whitespacees by default.
-
Text Segmentation - Split segments at XLIFF segmentation boundaries, enable SRX rules for text segmentation, and select "Always split text at line breaks".
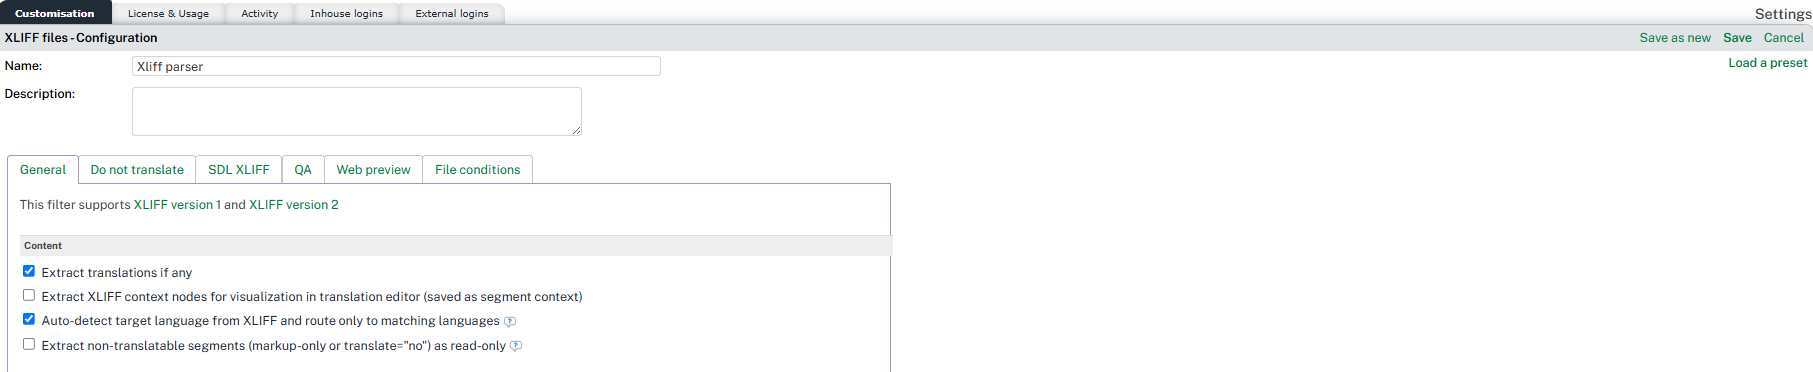
Auto-detect target language and route by matching language
When you mark bilingual XLIFF files online, or order them, Wordbee normally routes each file to every selected project language. For bilingual files this creates wrong-language duplicate documents: a German XLIFF is also sent to the French job, and so on. Turn this option on to have Wordbee read each file's declared target language and route it only to the project languages that match.
Enable Auto-detect target language from XLIFF and route only to matching languages in the Content section of the General tab. The option is off by default.
When it is on:
-
Wordbee reads the target language declared in each file (target-language per file section in XLIFF 1, trgLang on the root element in XLIFF 2) and marks the file only for the selected languages that match it. Other selected languages are skipped for that file.
-
Languages match on their base language: a
de-DEfile matches ade-ATproject language. Script variants do not match: Simplified Chinese (zh-Hans,zh-CN) is treated as different from Traditional Chinese (zh-Hant,zh-TW). -
Files with no declared target are marked for all selected languages, exactly as before.
-
If a file's target matches none of the selected languages, the file is skipped with a warning and the other files continue. When you mark files online, the batch still completes with the warning. When you place a regular order (or submit a single file through the API), the operation fails if every file is skipped.
This option applies when marking files online (Standard and Codyt projects) and when ordering through the regular order process. The routed languages are reflected in the quote, the created jobs, and the invoice.
|
XLIFF declares |
Selected project languages |
Result |
|---|---|---|
|
|
|
Marked for |
|
|
|
Marked for |
|
|
|
Marked for both |
|
|
|
Marked for |
|
|
|
Marked for both (all Simplified) |
|
|
|
No match: file skipped with a warning |
|
|
|
No match: file skipped with a warning |
|
(no declared target) |
any |
Marked for all selected languages |
This option changes only target-language routing; source-language checks are unchanged. Because a parser configuration can be shared across many projects, enable it on a configuration dedicated to your bilingual XLIFF workflow so other projects are not affected. For a multi-section XLIFF 1.2 file whose sections declare different targets, the file is routed to every selected language that matches any section, but each resulting document contains the full file content (sections are not split per language); split the file if you need per-section routing.
Extract non-translatable segments as read-only
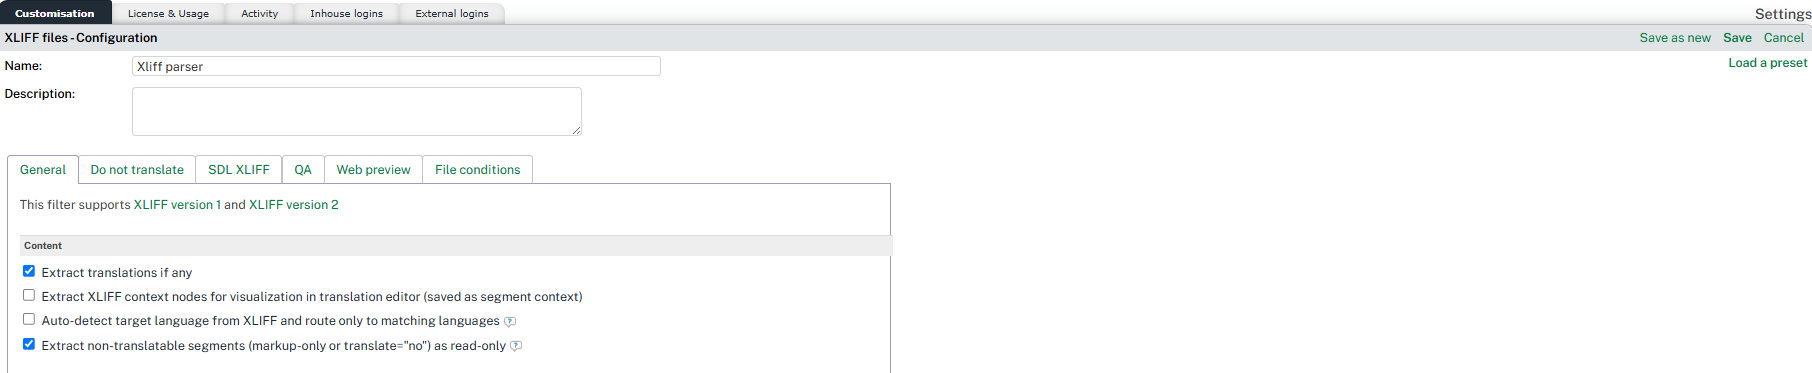
Some XLIFF files contain rows that have nothing to translate: rows whose only content is inline markup or placeholders (for example a speaker marker such as <Sam>), or units and segments the file explicitly flags with translate="no". By default these rows are dropped on import, so the project no longer mirrors the original file. Turn this option on to keep them as locked, read-only rows so translators see the full context without being able to edit the technical content.
Enable Extract non-translatable segments (markup-only or translate="no") as read-only in the Content section of the General tab, directly after Extract XLIFF context nodes. The option is off by default, and applies to both XLIFF 1 and XLIFF 2.
When it is on:
-
Markup-only rows (source that is empty once inline tags are stripped) and units or segments explicitly flagged
translate="no"with real text are kept instead of dropped. -
Preserved rows are locked (read-only) and flagged green (OK), so quality checks such as empty-target or source-equals-target do not fire on them.
-
The target is kept if the file already has one, otherwise it is pre-filled from the source, and written back unchanged on preview and delivery.
-
Inherited
translate="no"on a whole<file>or<group>is not imported, and the HTML parser is unaffected.
Word count: Markup-only rows contain 0 words. Rows flagged translate="no" that hold real text do contain words. Because all preserved rows are locked, use the existing word-count option to not count locked translations as translatable to keep them out of billable counts.
When enabling the option "Always split text at line breaks" in the XLIFF configuration, consider the following scenarios:

Scenario 1. If there is no HTML content in the XLIFF file:
There will be no line breaks when enabling the Content is HTML option because the HTML parser removes white spaces from the segments which are considered line brakes in XLIFF.
Scenario 2. If there is HTML content in the XLIFF file:
There will be line breaks when enabling the Content is HTML option provided that the HTML content contains HTML breaking tags (eg: <p>, <div>....etc). The HTML parser will remove the white spaces from the segments unless the HTML breaking tags (eg: <p>, <div>) are included in both the HTML content of the XLIFF file and the HTML configuration attached to the XLIFF configuration. See XLIFF 2 Information.
Do not translate settings
Exclude Content - Configure content to be translated or not translated when the system looks for texts or regular expression patterns.
-
Segments
-
Words or terms
-
Attributes and comments
SDL XLIFF settings
The SDL XLIFF tab may be used to load advanced properties when XLIFF files have been produced by other CAT tools.
-
Extract Origin of Translations - The SDL 'origin' attribute specifies the origin of the translation: 'tm' for translation memory, 'mt' for machine translation, etc. The SDL 'percent' attribute tells whether a pretranslation is exact, fuzzy or perfect. These fields will be mapped to the respective fields in Wordbee Translator. The Wordbee word count will then take into consideration these values.
QA settings
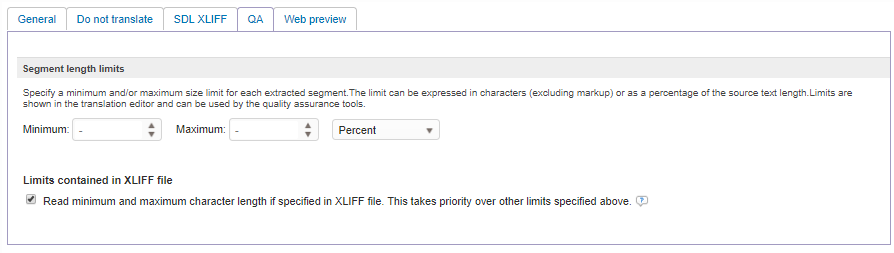
Pass over restrictions on the size of the segments to highlight issues when performing quality assurance checks.
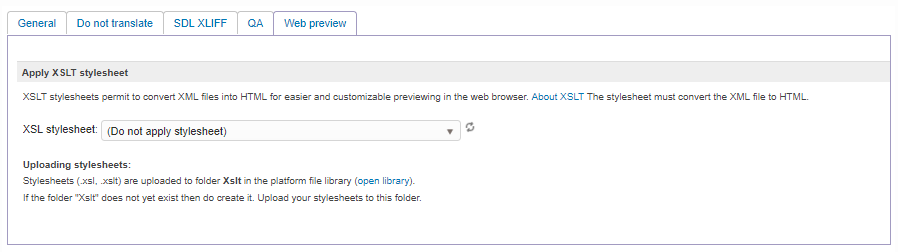
Web preview settings
Wordbee supports web preview with XSLT stylesheets allowing the conversion of XML files into HTML for easier and customizable previewing in the web browser. The stylesheet must convert the XML file to HTML (find more details in this help page XSLT). You can have a library with all your stylesheets available in the platform by uploading them within a specific folder in My Company > Documents.
Find more help on how to set this up within the parser page itself:
View our XLIFF file format Questions and Answers section to learn how to perform common file format customizations. These examples are the most frequently answered by our support team.
Learn more
To learn more about working with file format configurations, see the following pages: