
The Editor includes a Comments panel where you and your team can leave messages on segments, exchange feedback during the localization process, and track open questions until they are resolved. Comments are always linked to a specific language, so everyone sees the same context when reviewing the work.
To open the Comments panel, click the Panels menu and select Comments, or press Alt+Shift+C.
The Comments Panel
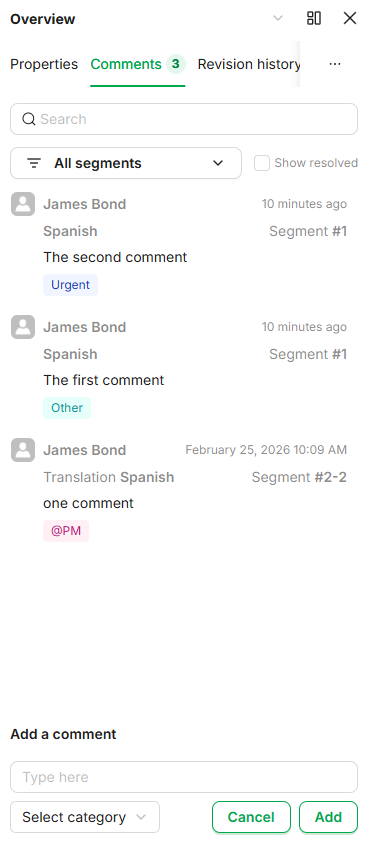
The Comments panel shows all comments attached to the segments in your document. Comments are sorted from newest to oldest. Each entry shows:
-
The author and timestamp (relative for recent comments, e.g., "a minute ago"; full date for older ones)
-
The job type the comment was posted from (e.g., Translation), if applicable
-
The segment number the comment belongs to
-
A category badge (e.g., @PM), if one was assigned
What you can see and do in the Comments panel depends on your access rights. Comments made before your job start date may not be visible, and the edit, delete, and resolve actions may not appear for other users' comments. If you encounter either of these limitations, contact your administrator. See Access Rights (Admin) in the Learn More section below for configuration details.
Filtering and Searching
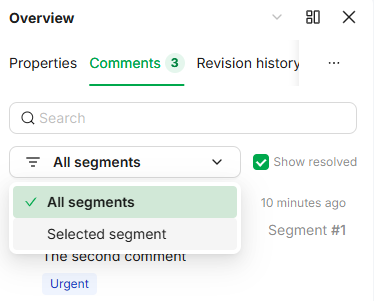
The filter bar at the top of the panel lets you narrow the list to find what you need quickly.
-
All segments (default): shows comments for all segments visible in the grid.
-
Selected segment: shows only comments for the segment currently selected in the grid.
-
Show resolved checkbox: check to include resolved comments in the list.
-
Search bar: find comments by text content.
Adding a Comment
To leave a comment, you first need to select the language segment you want to comment on. Comments are always linked to a specific language.
To add a comment:
-
Click a language cell in the grid to select it.
-
In the Comments panel, type your message in the Add a comment field. This field stays pinned at the top of the panel, so it is always in view: you never have to scroll to find it.
-
Optionally, select a category from the dropdown (e.g., @PM). Categories are pre-defined by your administrator.
-
Click Add.
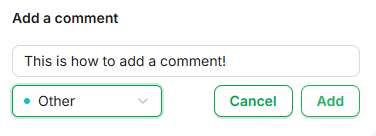
The comment appears at the top of the list with your name, the current timestamp, and your job type (if you are working within a job).
Notify people by email
When you add a comment, you can also email it to the people who need to see it. Notifications are never sent automatically: an email goes out only when you choose recipients and post the comment.
Follow these steps to add a comment and notify people:
-
Type your message in the Add a comment field and, optionally, select a category.
-
Click the envelope icon at the top-right of the Add a comment field.
-
In the popover, tick the people to notify. Recipients are grouped into Managers and Workers; none are pre-selected.
-
Close the popover. Avatar chips next to the envelope show who you picked.
-
Click Add. The comment is saved and the email is sent in one step.
To drop a pending selection, click Cancel (this clears the whole field).
The recipient list includes the project manager, additional managers, and the people working on the job; it never includes you. If no one is available, the envelope is greyed out with a tooltip.
Which managers are offered
Because a comment always belongs to one language, the list of additional managers is matched to that language. Each additional manager on a project is configured for a language pair on the project details, and the recipient list honours that configuration: commenting on a Spanish translation no longer offers a manager who only covers Japanese.
Managers configured for All languages, or for any source language into your target language, are still offered. The project manager covers the whole project and is always listed.
This applies to both the current Editor and the new one.
Managing Comments
Once a comment is posted, you can edit its text, delete it, or mark it as resolved. Hover over a comment to reveal the action icons on the right. By default, these actions are only available for your own comments.
|
Icon |
Action |
Notes |
|---|---|---|
|
Pencil |
Edit |
Edits the comment text. The original author and creation date are always preserved. |
|
Trash |
Delete |
Permanently removes the comment. |
|
Checkmark |
Resolve |
Marks the topic as addressed. Resolved comments are hidden by default. |
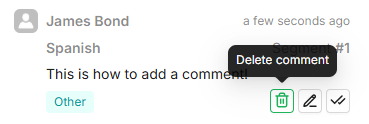
Deleting a comment is permanent. If you want to preserve the conversation history for future reference, resolve the comment instead of deleting it.
Notify people about an existing comment
-
Hover over the comment and click the envelope icon.
-
Tick the people to notify.
-
Click Send.
If you close the popover before sending, your selection is remembered for that comment until you send it.
The recipient list follows the same language matching described above, using the language the comment belongs to.
Resolving and Unresolving
Resolving a comment signals that the question or topic has been addressed. Click the checkmark icon to resolve, and click it again to unresolve. Resolving does not change the original author or creation date.
To view resolved comments, check the Show resolved box in the filter bar.
Comments in the Grid
The grid can display comments as a read-only column, so you can scan feedback inline without opening the Comments panel. This is useful when reviewing large amounts of content or when you want to keep other side panels open.
To add the Comments column:
-
Open the Fields panel.
-
Under language fields, select Comments.
-
The column appears in the grid with the header Comments — [Language] (e.g., "Comments — Spanish").
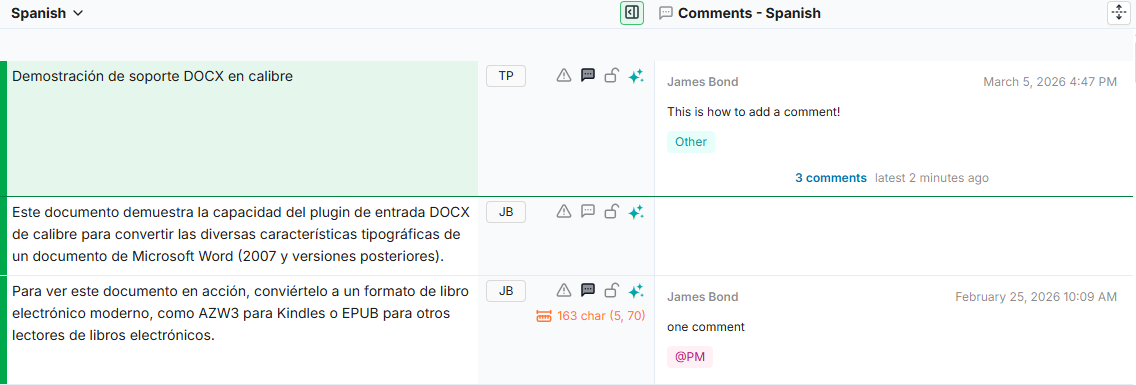
Each cell shows the author, date, comment text, and category badge. The column is read-only — to add or manage comments, use the Comments panel.
Learn More
-
Fields Panel: Configure which columns are visible in the grid. You can add Comments as a read-only column.
-
Comment Categories: Configure comment categories displayed in the Editor.
-
Access Rights: Configure user profiles and permissions, including comment visibility (R259) and the ability to act on other users' comments (R265).